Building a Custom Rifle: Step 3-When a Rifle is Born

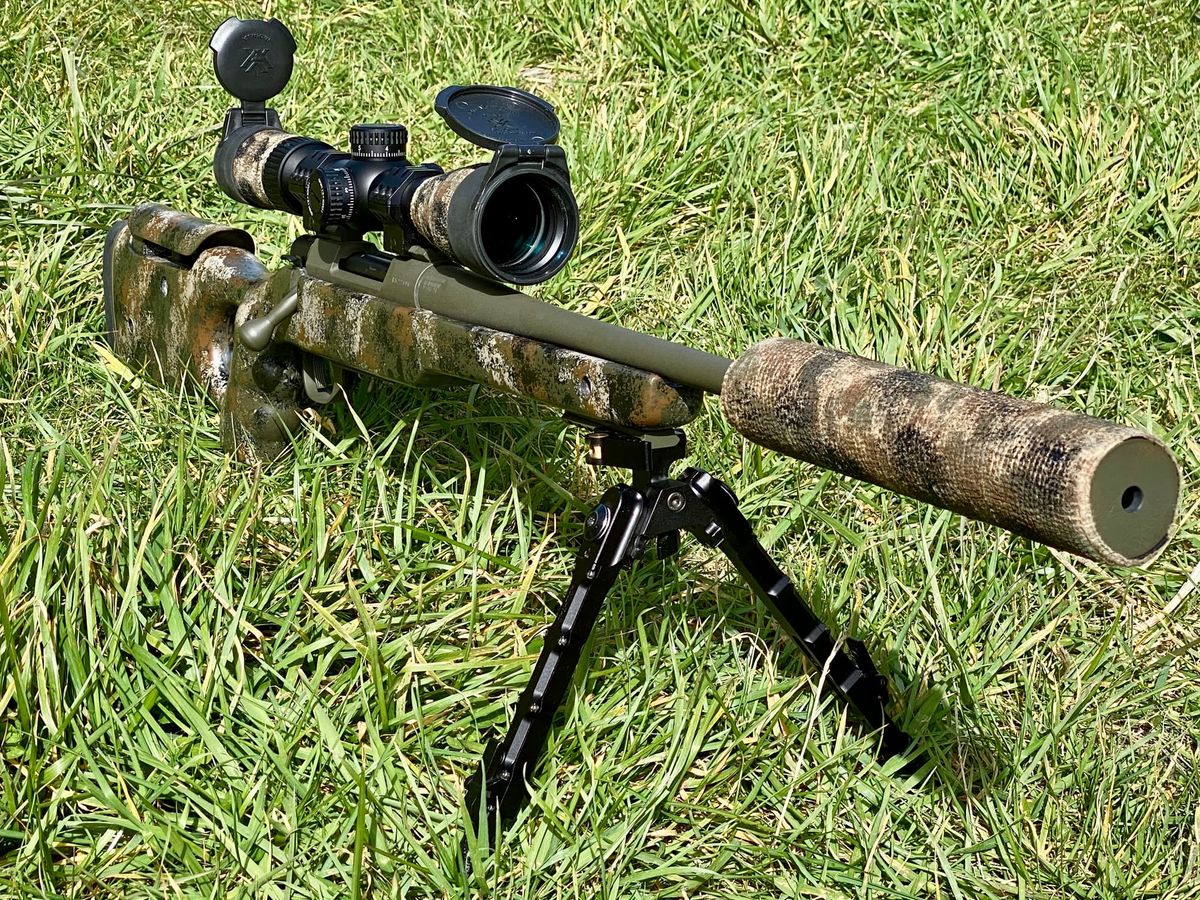
In the first two articles of this series, we built the foundation for this project. First came the plug, carefully shaped until it fitted me exactly the way I wanted a rifle to fit. That plug then became a composite mould capable of producing multiple composite rifle stocks.
This is where the rubber meets the road.
This is where those moulds finally produce something that starts looking like a rifle instead of just another composite project.
Although this article follows the manufacturing process step-by-step, it is really about something much bigger. I wasn’t simply trying to build a lightweight rifle stock, I was building a shooting platform that fitted me perfectly. Whether I was hunting, competing at long range or practising with a .22 LR trainer, I wanted every rifle to shoulder the same, feel the same and behave the same and thus become become an extension of myself.
In precision shooting, everything comes back to one thing:
Repeatability
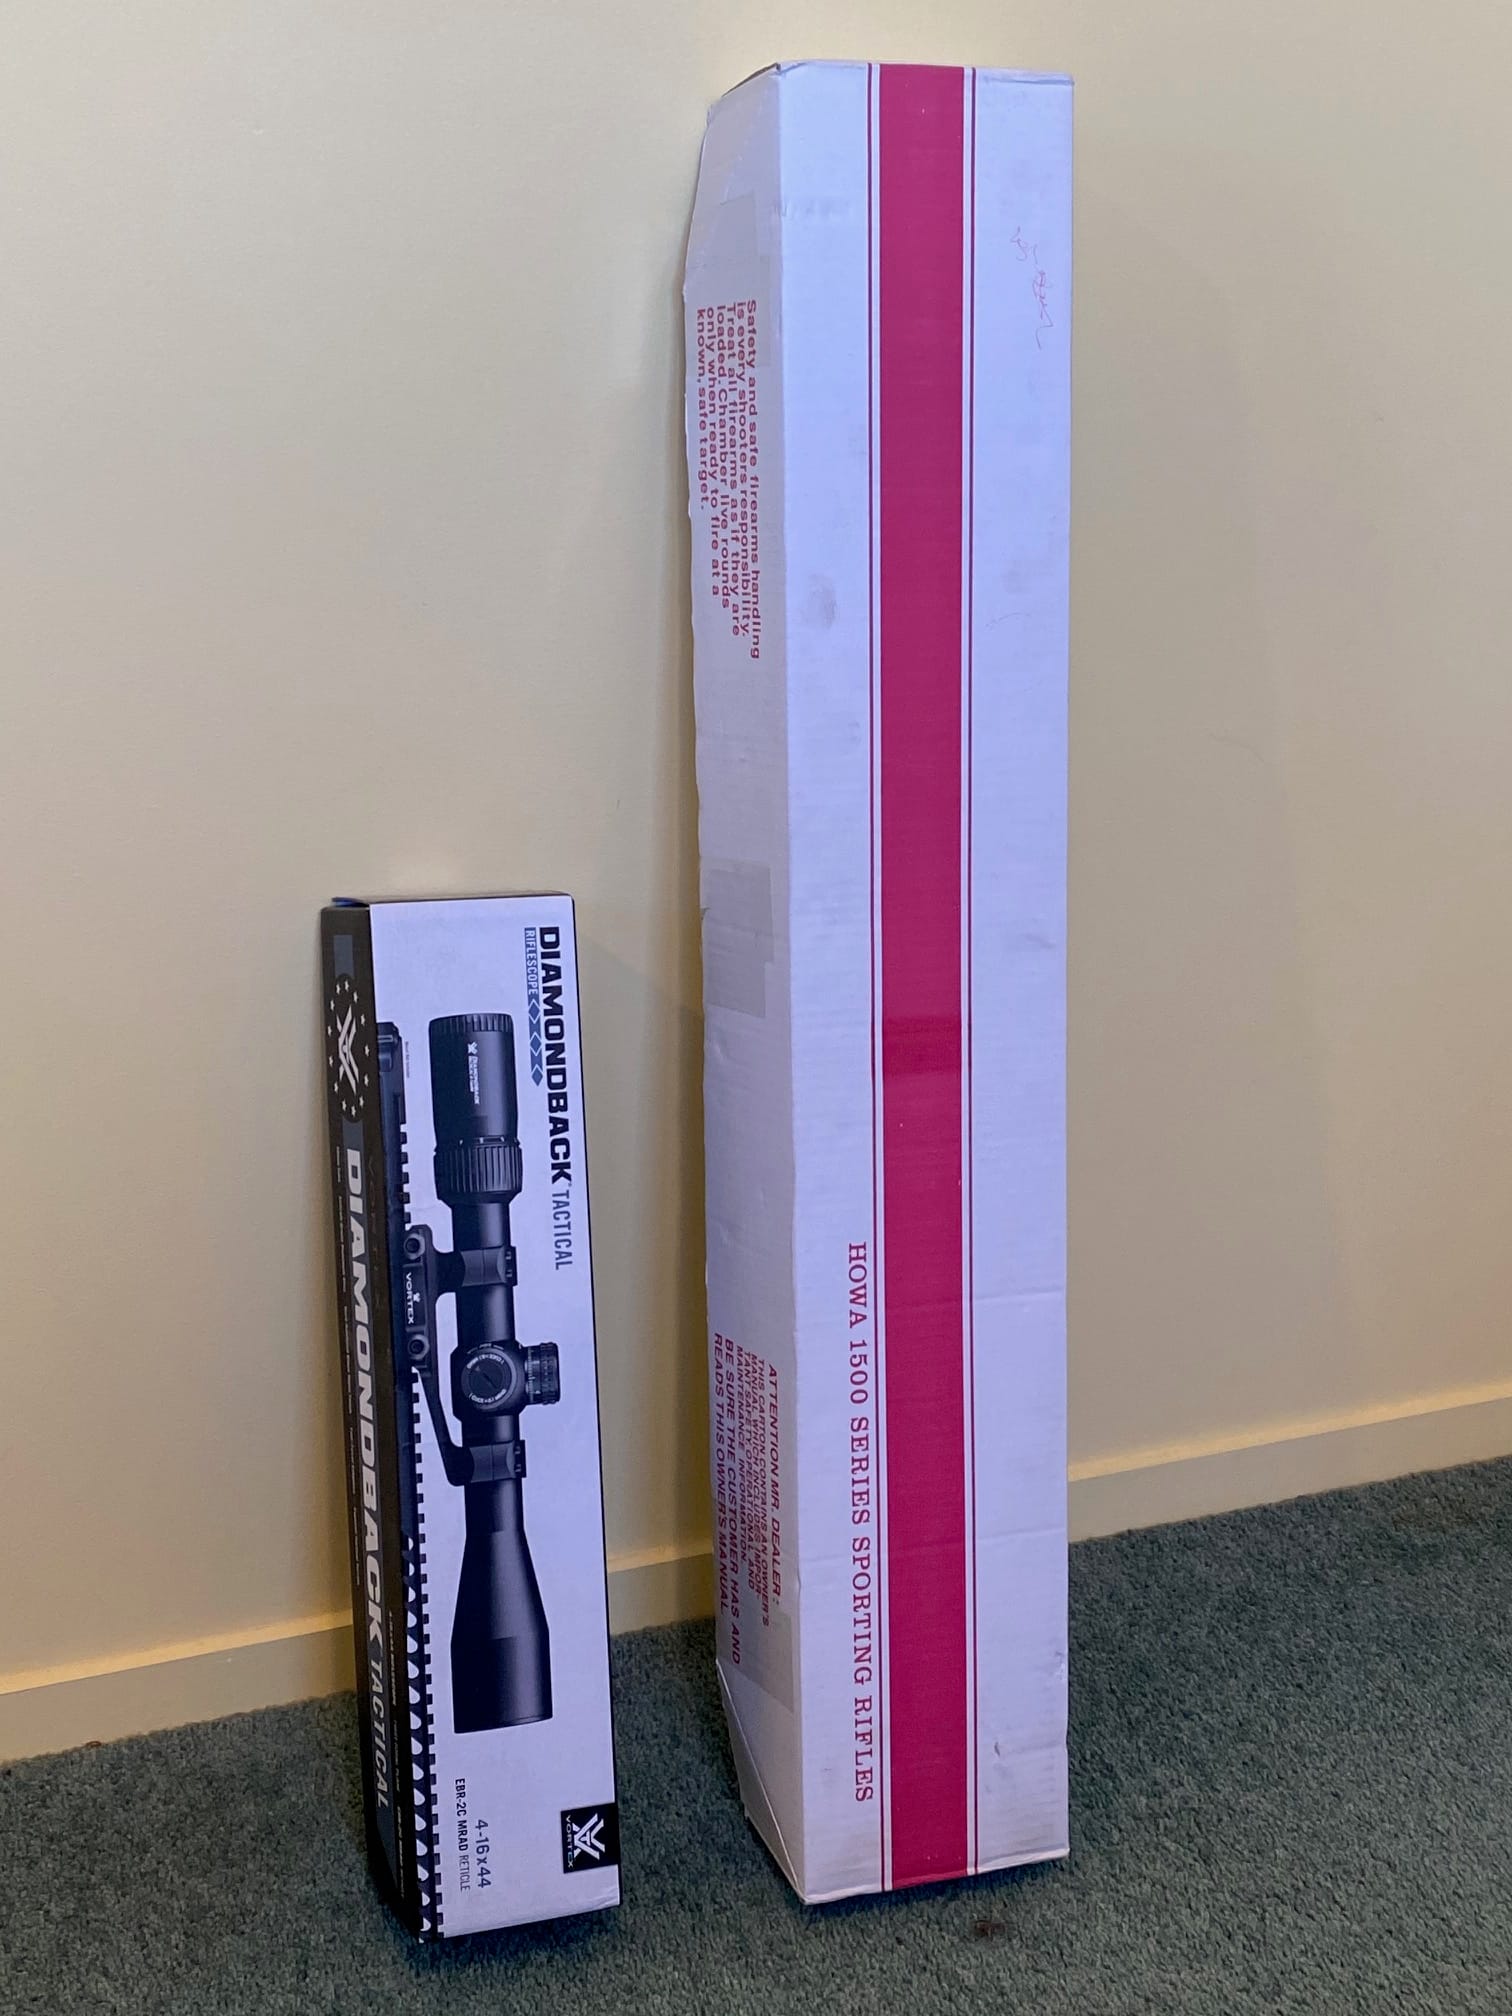
Before building the stock itself, I had already selected the platform that this project would be built around.
I chose the Howa 1500 short-action platform. The barreled action shown here is chambered in 6.5 Creedmoor and was paired with a Vortex scope, but the stock itself was designed around the Howa short action rather than one specific calibre.
My intention for this particular build was to create a lightweight hunting rifle capable of delivering excellent accuracy without sacrificing reliability in the field.
The action would ultimately dictate every critical dimension inside the stock, so from this point onwards every machining operation would revolve around fitting the short-action platform perfectly.
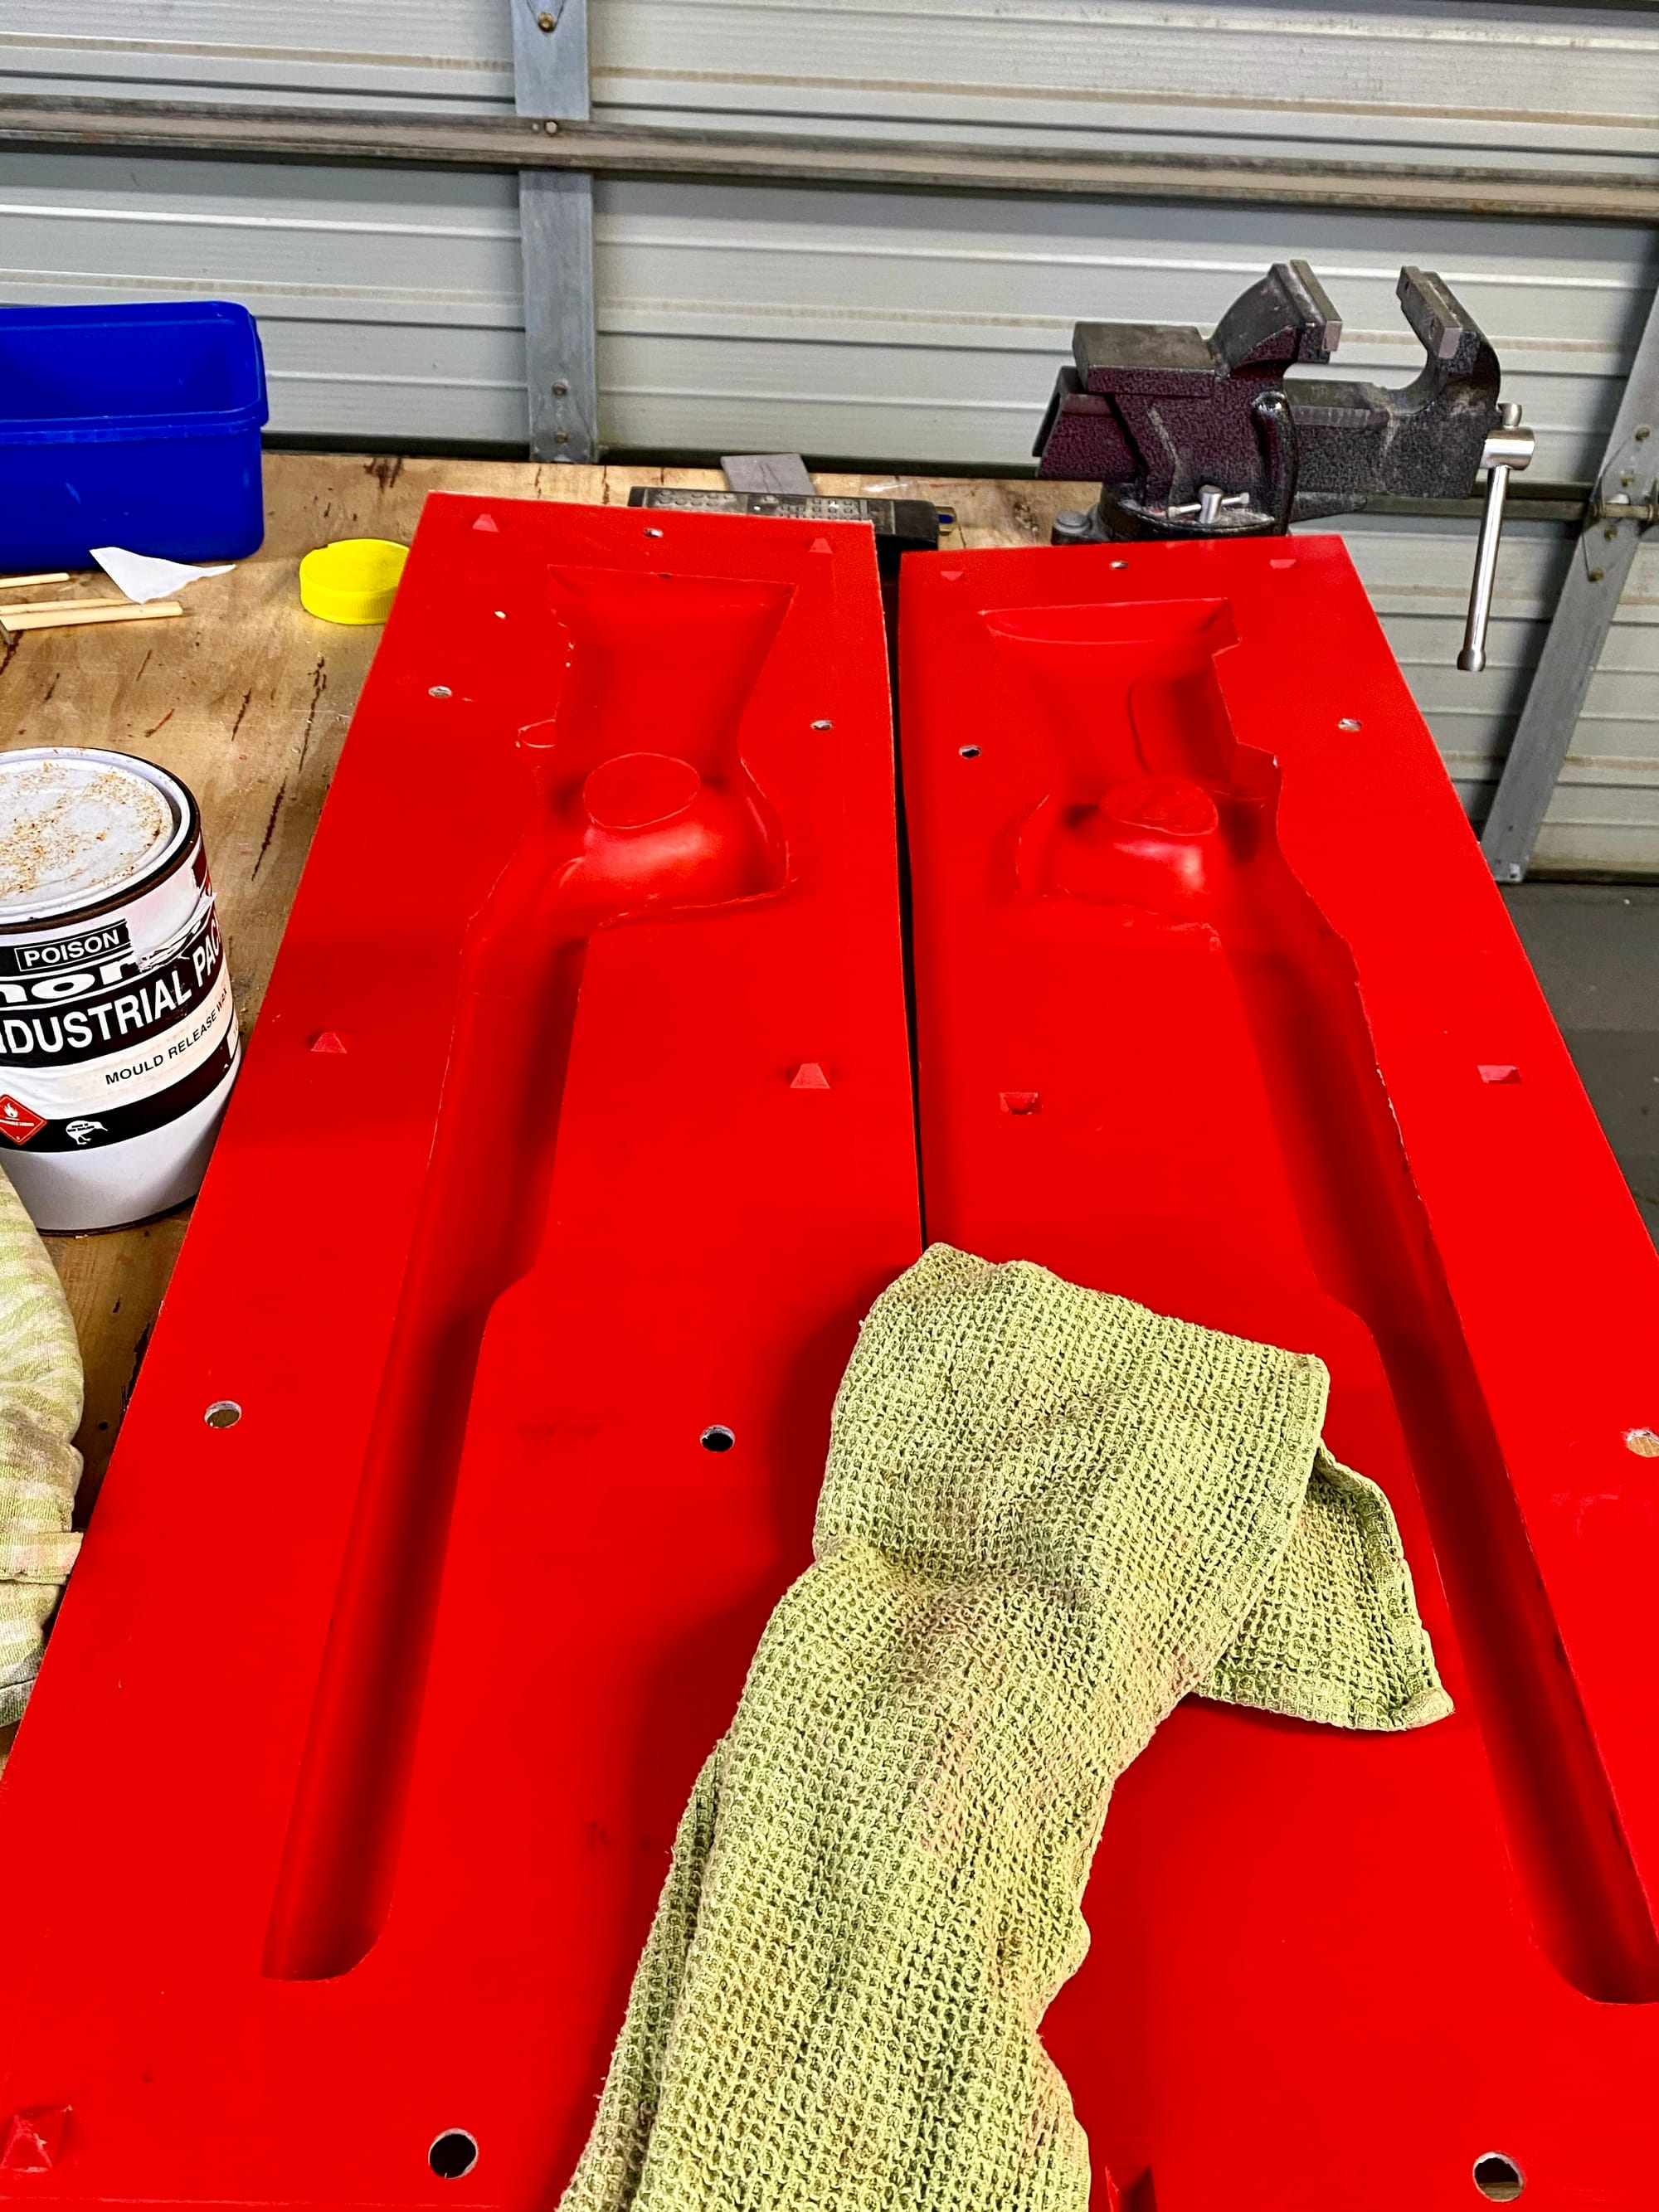
In the previous article I covered the mould construction, so I won’t repeat that process here.
Before any carbon fibre went into the mould, the mould surfaces had to be prepared properly. Any small burrs, rough edges or imperfections were cleaned up first. I then applied multiple coats of mould release wax, allowing each coat to dry before buffing it off and applying the next one.
After the wax layers were complete, I applied two or three thin coats of PVC release agent. I used a spray gun, although it can also be applied carefully with a sponge. Each coat was allowed to dry before the next one was added. This creates a very thin plastic-like release layer between the mould and the composite material.
Only then could the wet lay-up begin.
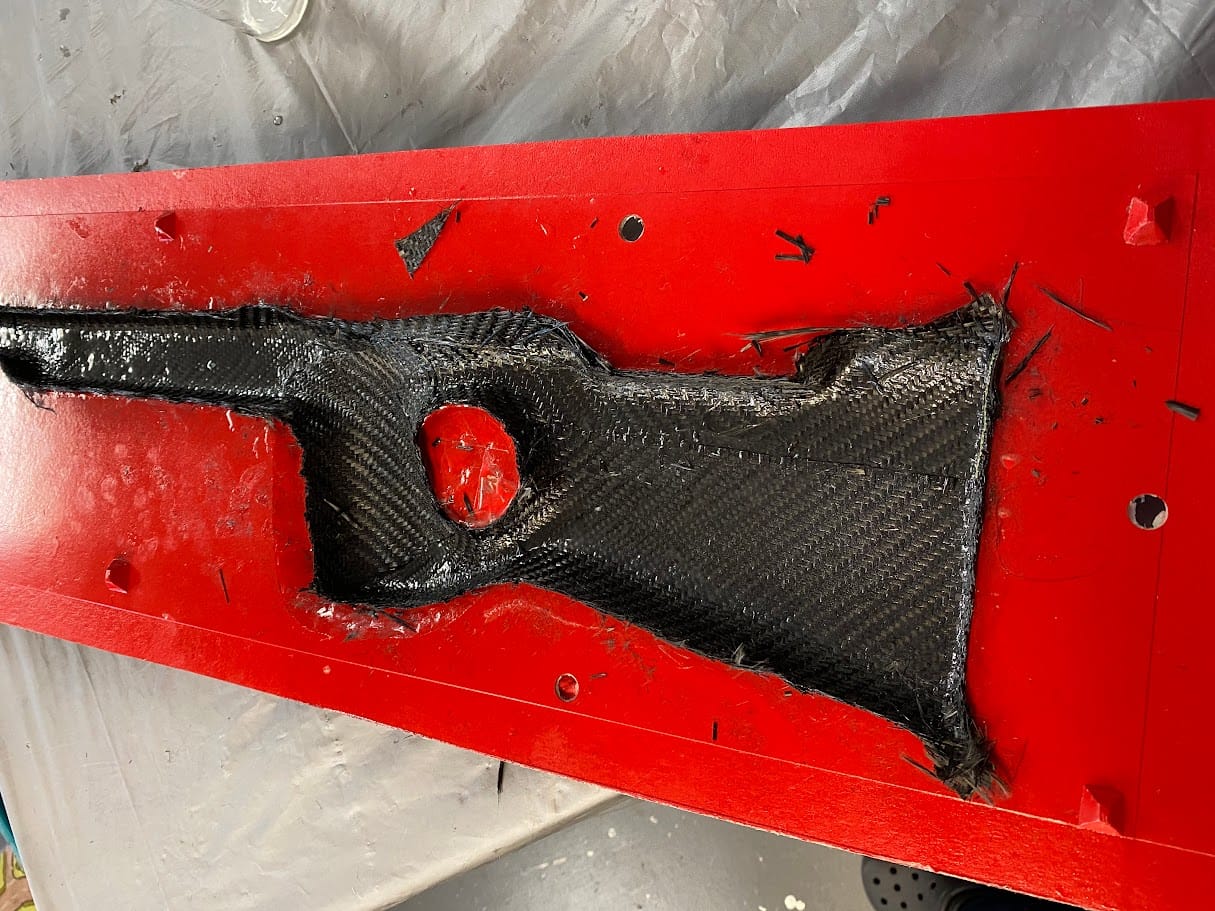
Multiple layers of carbon fibre were laid into each half of the mould using epoxy resin. Each layer contributes to the final wall thickness and stiffness of the stock, so this is not simply a matter of throwing more carbon fibre at it. Planning the lay-up is just as important as the mould itself.
The carbon fibre also had to be worked carefully into every small nook and cranny of the mould. Each layer was pressed firmly into place while checking for trapped air and making sure the cloth followed the shape of the mould without bridging over corners or detailed areas.
This is a meticulous process.
Small air pockets or areas where the cloth has not been pushed fully into the mould can become weak spots or visible imperfections in the finished stock.
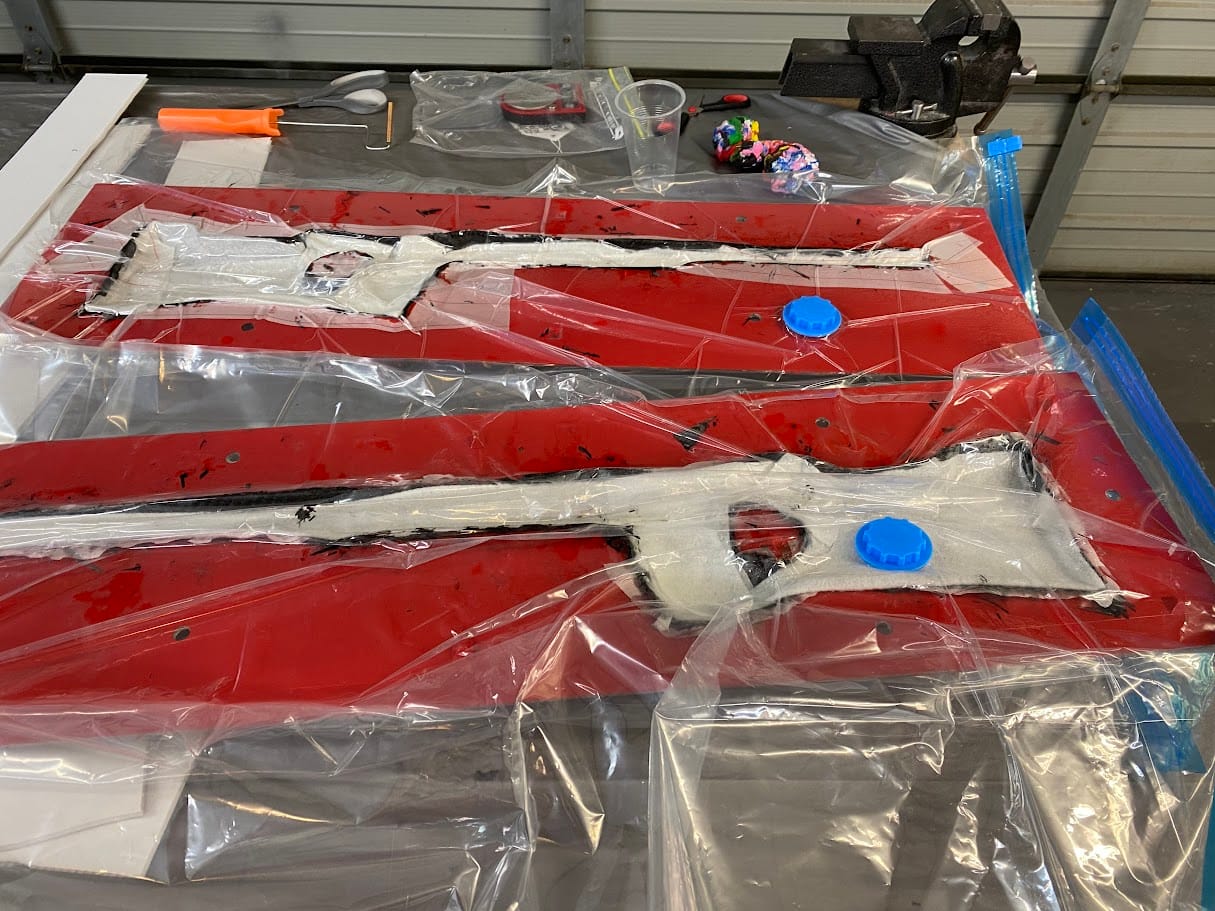
Once all the carbon fibre layers had been positioned, both mould halves were vacuum bagged.
The vacuum removes trapped air and compresses the laminate tightly against the mould. It also draws out excess resin from between the layers. The goal is not to remove all the resin, but to achieve the correct balance - just enough resin to fully wet the carbon fibre, without carrying unnecessary excess resin in the finished laminate.
The peel ply and the other absorbent consumable layers help collect that excess resin while the vacuum keeps the entire lay-up compressed.
This produces a stronger and lighter composite, with a much better surface finish than an uncompressed wet lay-up.
After curing, the vacuum bags, peel ply and other consumable layers could be removed, leaving two completed carbon fibre halves ready for assembly.
💡 Workshop Tip
You don’t necessarily need a professional composite vacuum system for a project like this. I used ordinary vacuum storage bags - the type sold for storing clothing and a normal household vacuum cleaner to extract the air. It worked perfectly well for what I needed.
With the two halves completed, the next challenge was turning them into one solid stock.
Simply gluing the two mating edges together would have created a surprisingly weak joint. There simply isn’t enough bonding area to rely on the edge of the laminate alone.
To overcome this, I cast a series of internal support lugs into the stock. These increase the bonding surface dramatically while also providing solid mounting locations for components such as the cheek rest and length-of-pull mechanisms that will be installed later.
Once the stock is complete, nobody will ever see these lugs—but they become some of the strongest structural components inside the entire rifle.
💡 Workshop Tip
Some of the most important work in a project disappears before the project is finished. Don’t rush the hidden parts.
Now came what I always considered the point of no return.
The adhesive used here was not a separate epoxy glue. I mixed more of the same epoxy resin used during the lay-up and added filler until it became a thicker adhesive paste.
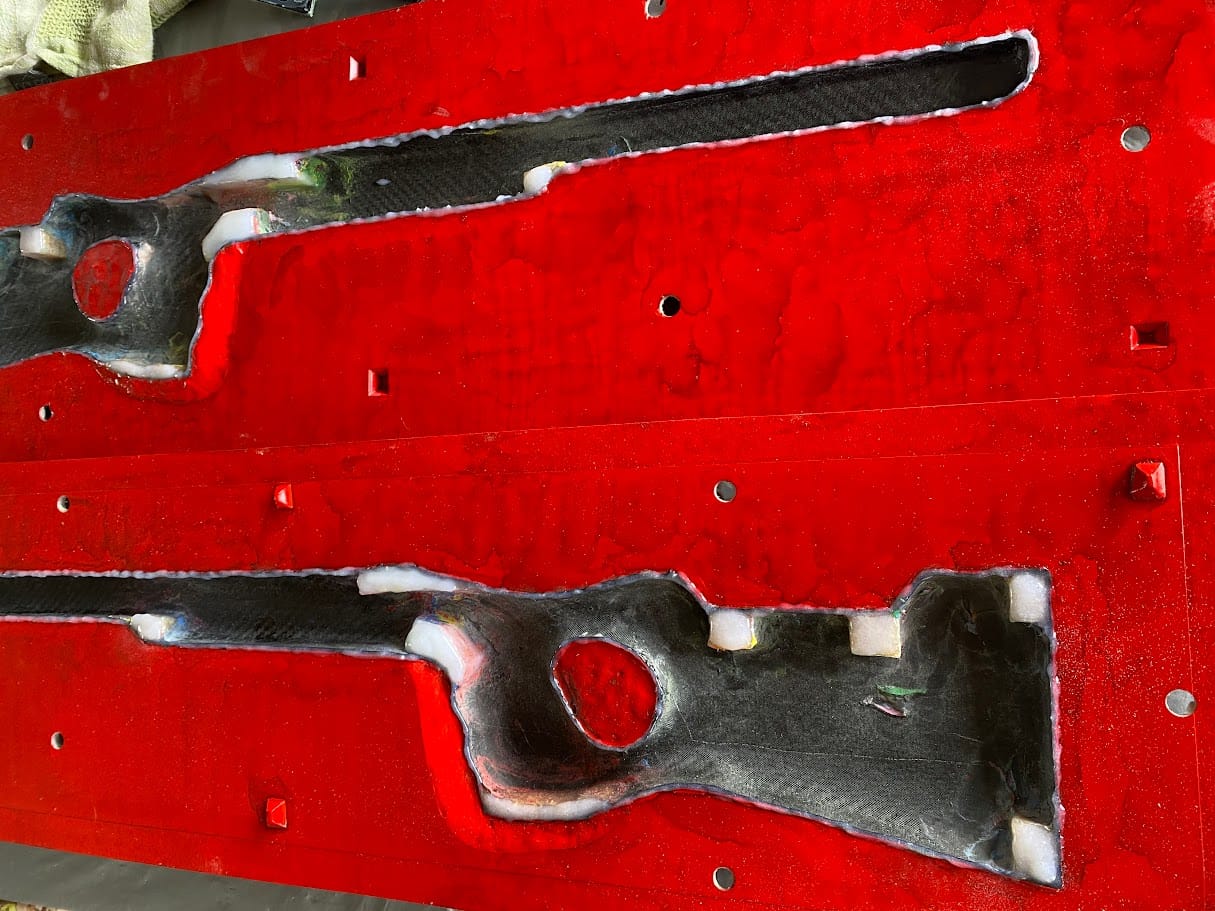
A small bead of this mixture was applied along the mating rim of both stock halves. More was applied to the corresponding support lugs on both sides.
This is important because the stock is not held together only by the narrow seam around its outer edge. The support lugs are also bonded together internally, creating a much larger total bonding area and turning the two shells into one solid structure.
The two halves were then carefully aligned and clamped together.
At this stage everything has to line up correctly. Once the epoxy cures, there is no easy way back.
Then came the waiting, before the moment of truth...
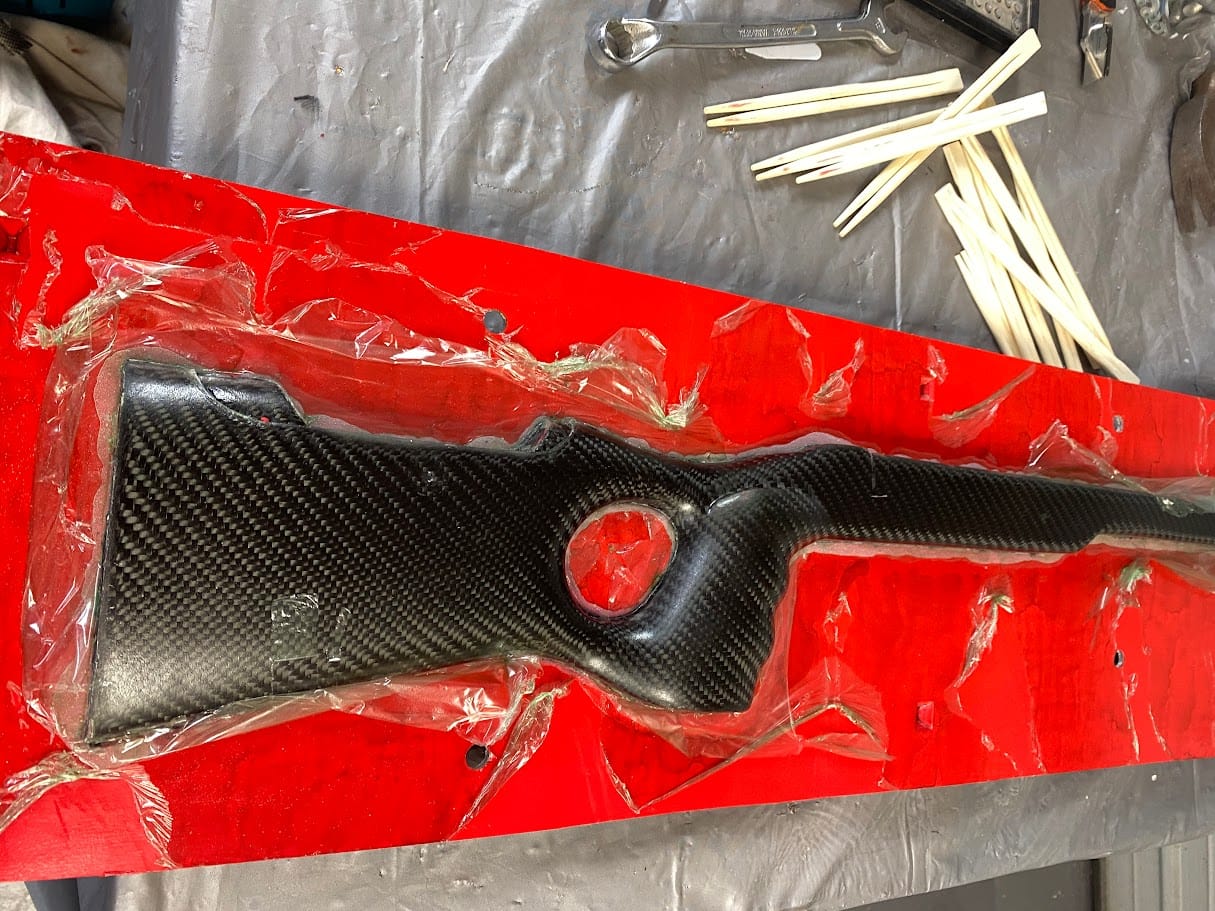
This is probably one of the most satisfying parts of the entire build.
After all the preparation, all the mould making and all the waiting, it was finally time to separate the completed stock from the mould.
You never really know whether every little detail has worked until this point.
Even with good mould preparation, the stock does not simply fall out. The mould halves have to be separated slowly and carefully, working a little at a time and avoiding anything that could scratch or damage the mould or the new stock.
This is where all those coats of mould release wax and the PVC release layer earn their keep.
As the mould was carefully pried apart, I applied lukewarm water along the separating surfaces. The water helps dissolve and wash away the PVC release layer. That creates the slightest extra clearance between the mould and the stock, which helps the parts release without forcing them.
Patience is key.
First one half of the mould was removed, revealing the first proper glimpse of the carbon fibre stock. The stock then still had to be worked carefully out of the remaining mould half.
Fortunately, everything released cleanly.
For the first time I could actually see the rifle stock as a single component instead of two mould halves.
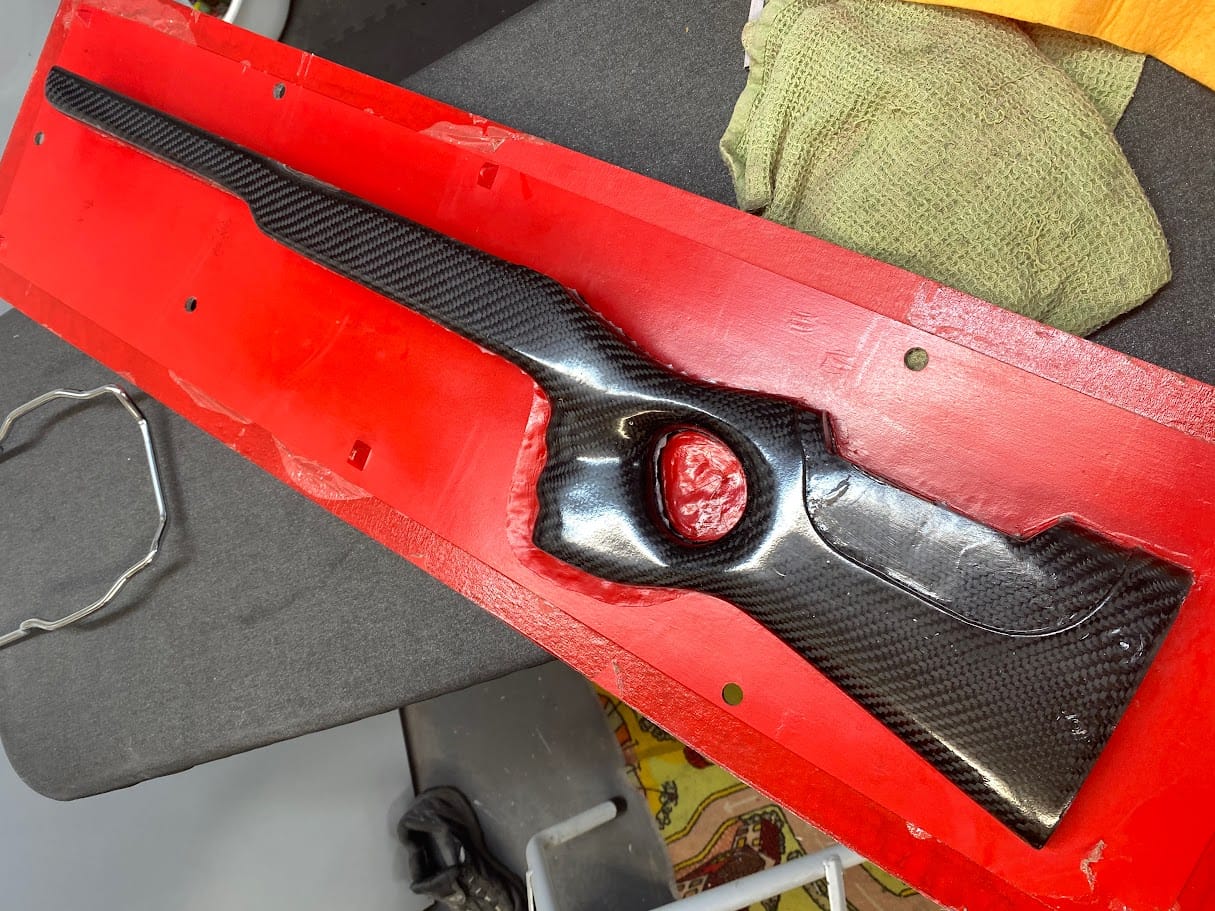
Once removed from the mould, the remaining release agent was cleaned away to reveal the carbon fibre surface underneath.
Although the stock already looked complete from the outside, it was still very much a rough component that required a significant amount of machining before it could accept the rifle action.
But finally…
It actually looked like a rifle stock.
The next stage involved carefully cutting all the required openings for the action, trigger, magazine and trigger guard.
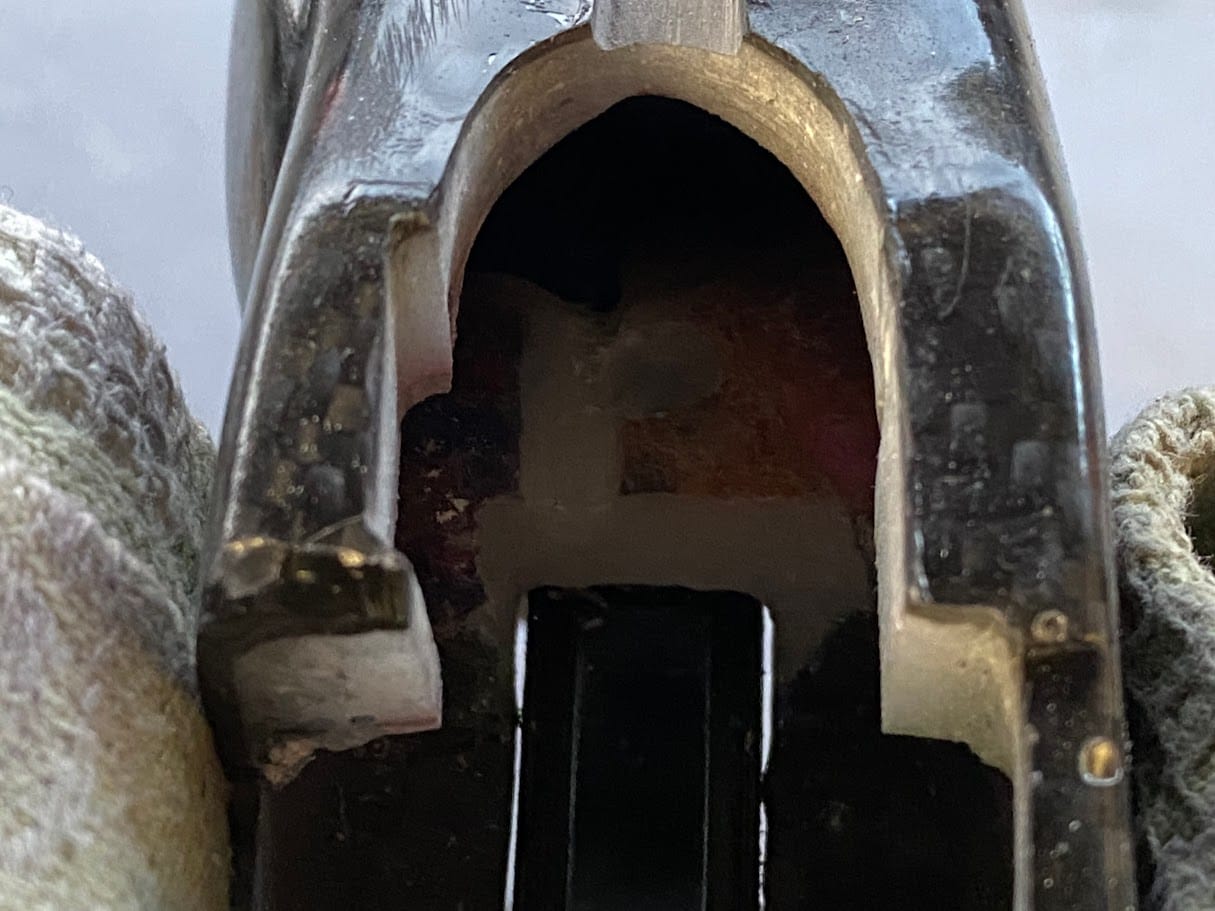
Templates were used to mark the various locations before the openings were gradually machined using a Dremel, files and sandpaper.
This is definitely one of those jobs where patience pays dividends.
It is very easy to remove material.
Putting it back is considerably harder.
The goal wasn’t simply to make the action fit.
The goal was to make it fit as though it had always belonged there.
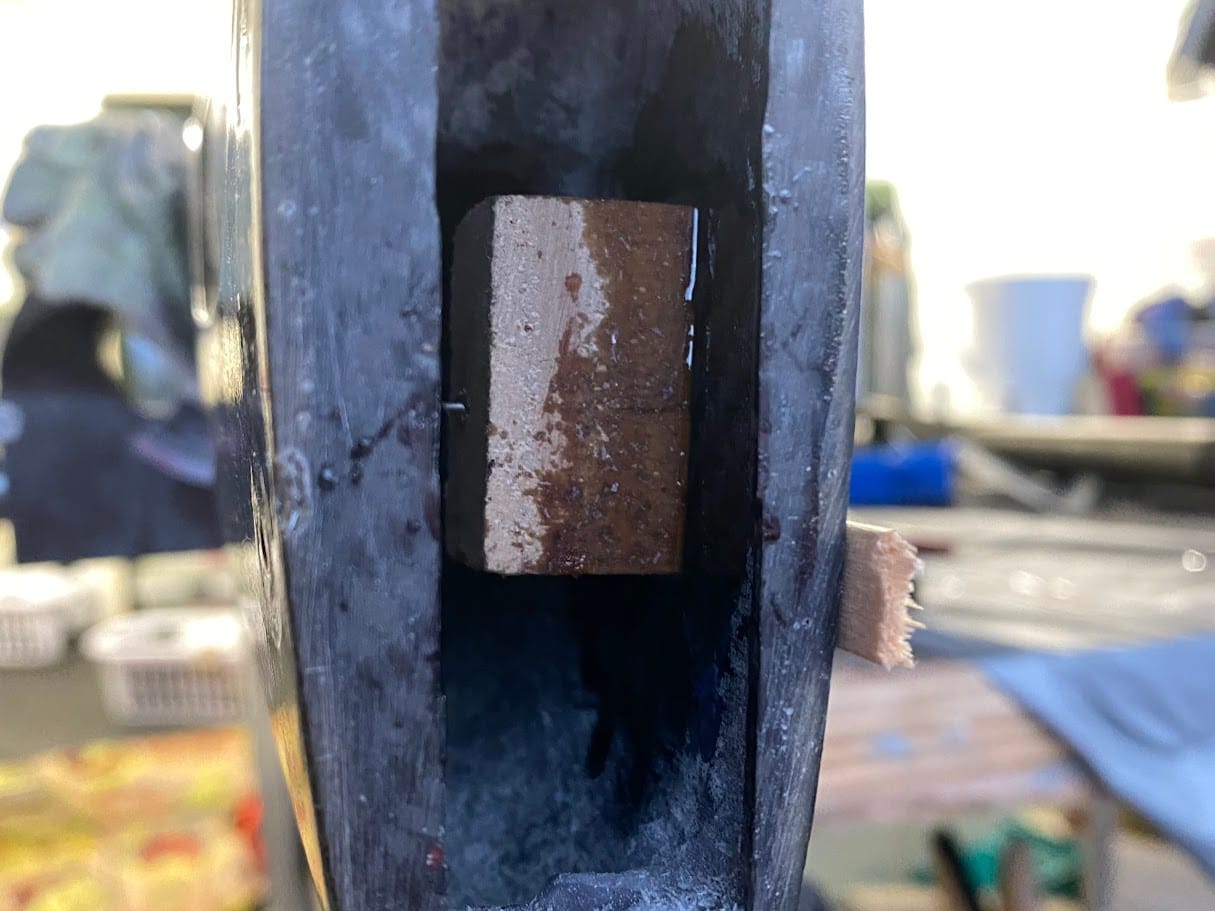
Although the internal support lugs already provided additional strength, certain components required larger mounting areas.
Solid wooden support blocks were epoxied inside the stock where the adjustable cheek rest and length-of-pull mechanisms would eventually be attached.
These supports provide a much stronger base for screws and fasteners than relying on the carbon fibre shell alone.
Like the support lugs, these pieces disappear once the rifle is assembled—but they play an important role in the long-term durability of the stock.
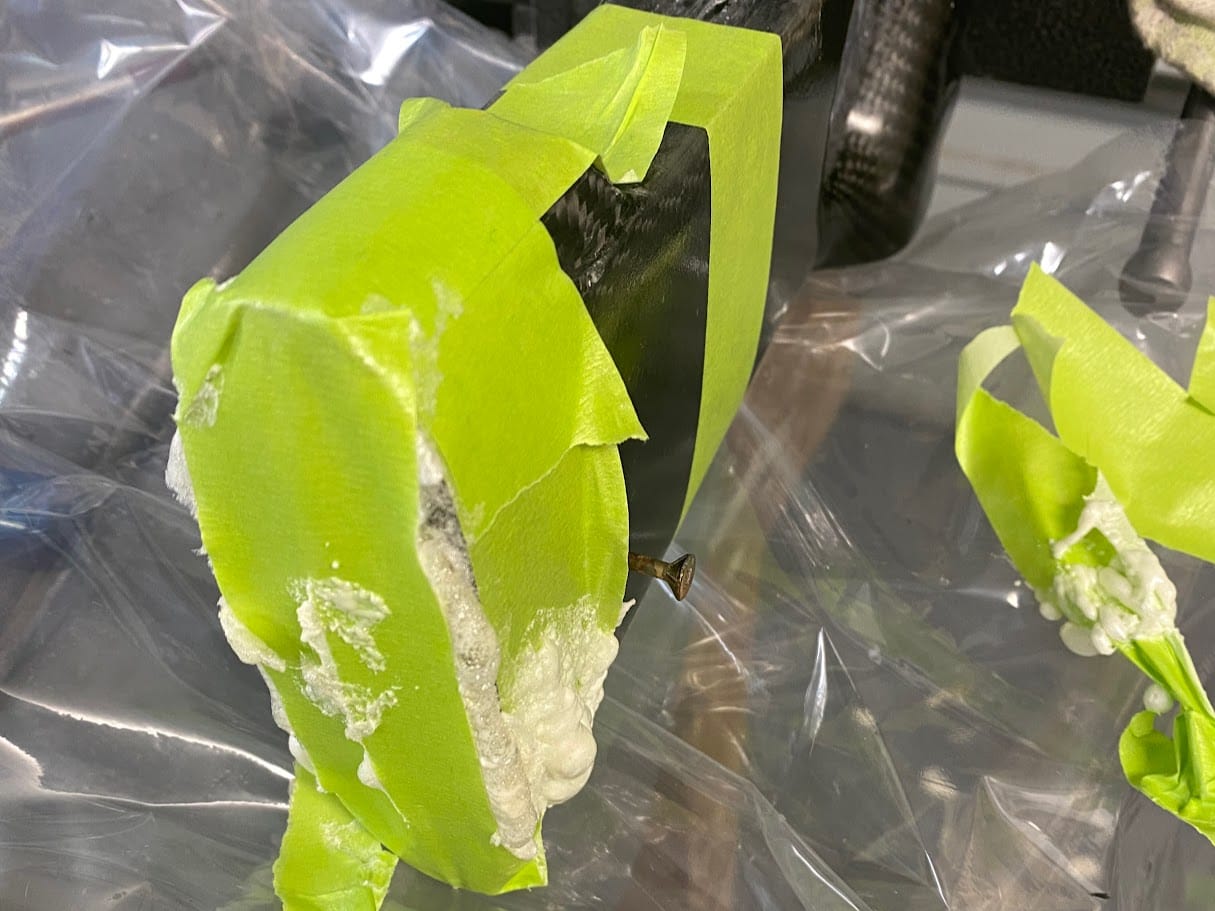
One of the disadvantages of any hollow composite stock is that it can sound like a drum.
For a hunting rifle, that’s the last thing you want.
Whether it’s a wedding ring touching the stock or the swivel on a sling accidentally tapping against it, those sounds travel surprisingly well through the bush.
To eliminate that hollow sound, the butt section was filled with expanding foam after sealing all the openings with masking tape and electrical tape.
The foam expands into the small internal spaces and helps deaden the sound. It also provides some additional internal support while adding very little weight.
Once cured, any foam that escaped through the taped openings could easily be trimmed away.
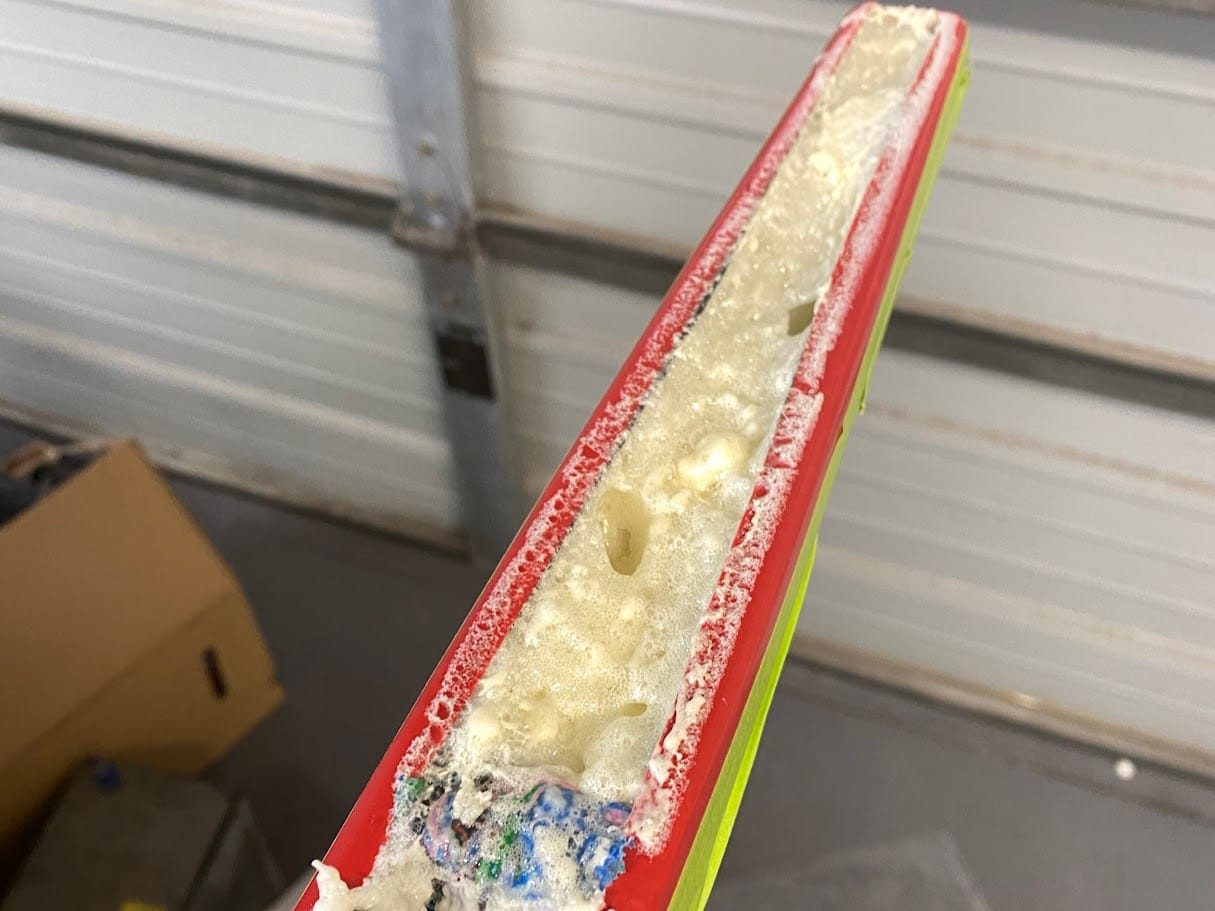
The same process was repeated in the fore-end.
The purpose here was again to fill the hollow space, reduce the drum-like sound and provide a lightweight core that could be shaped easily.
Once cured, the expanding foam is quite easy to cut, sand and machine. That made it possible to shape the fore-end core precisely before closing it with carbon fibre.
At this stage the foam was still exposed. The next step was to turn that shaped core into a finished, enclosed fore-end.
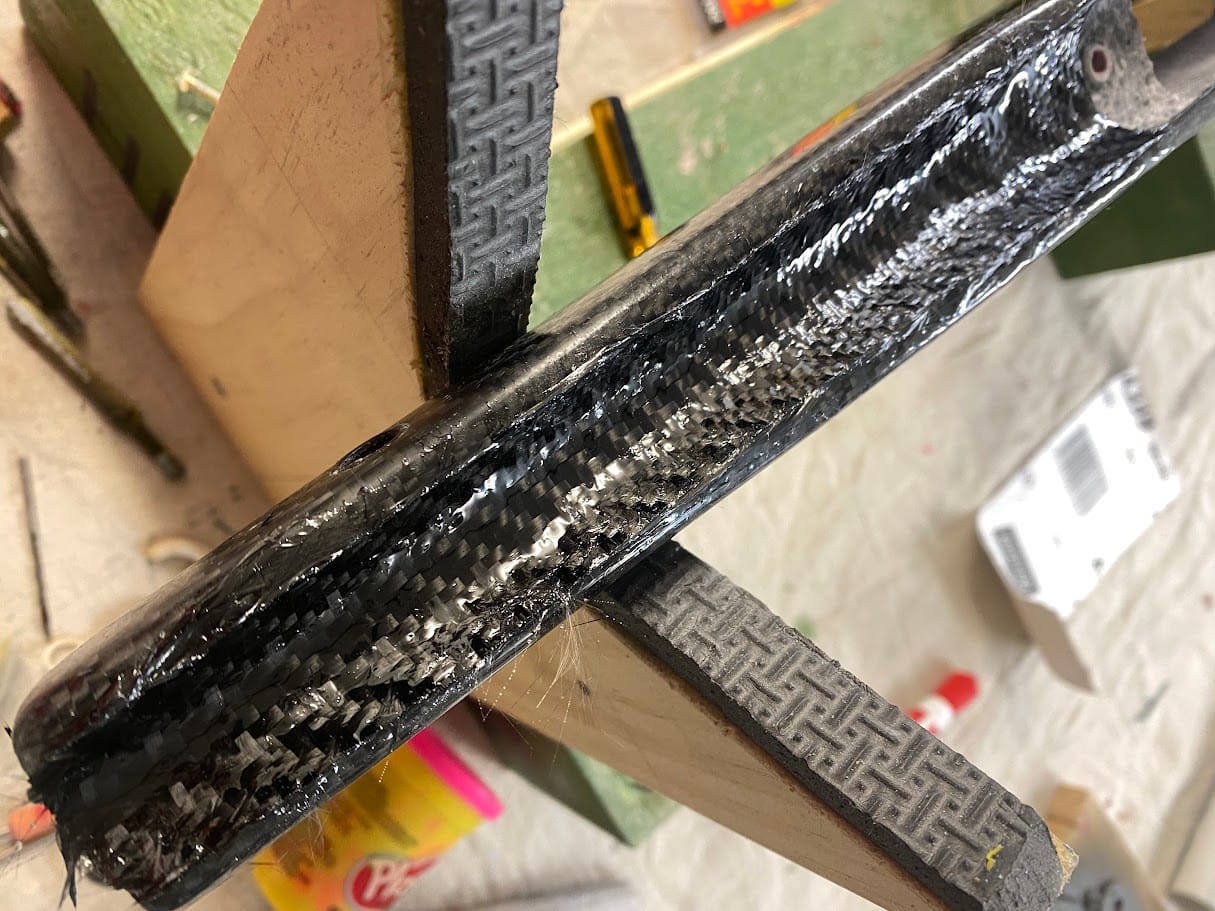
After the foam had been machined to the final profile, strips of carbon fibre were laminated over the exposed front section.
This closed the opening and tied the new surface back into the surrounding carbon fibre shell.
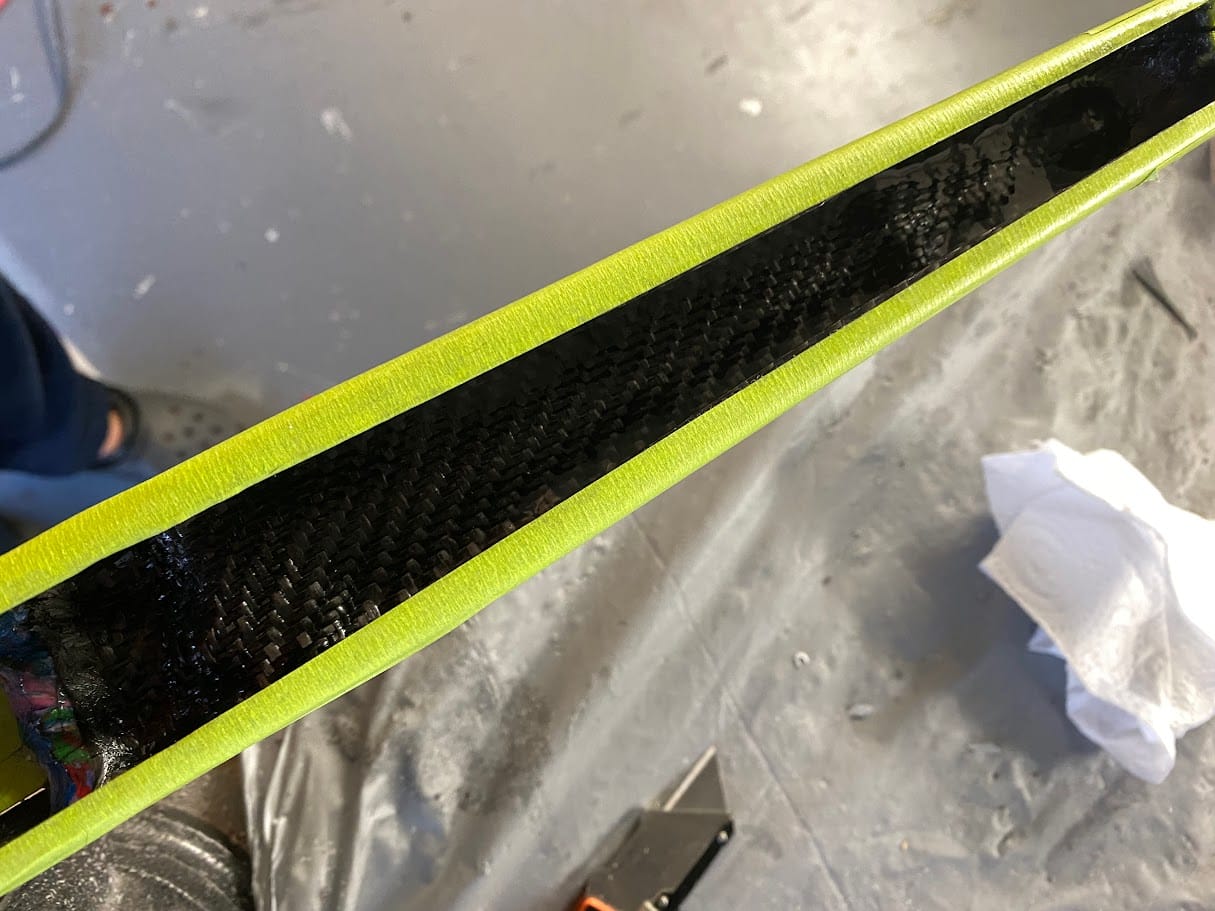
By taking the time to shape the foam first, I could achieve the exact fore-end profile I wanted without adding unnecessary weight.
The result was a rigid, fully enclosed fore-end with a clean carbon fibre surface that blended seamlessly into the rest of the stock.
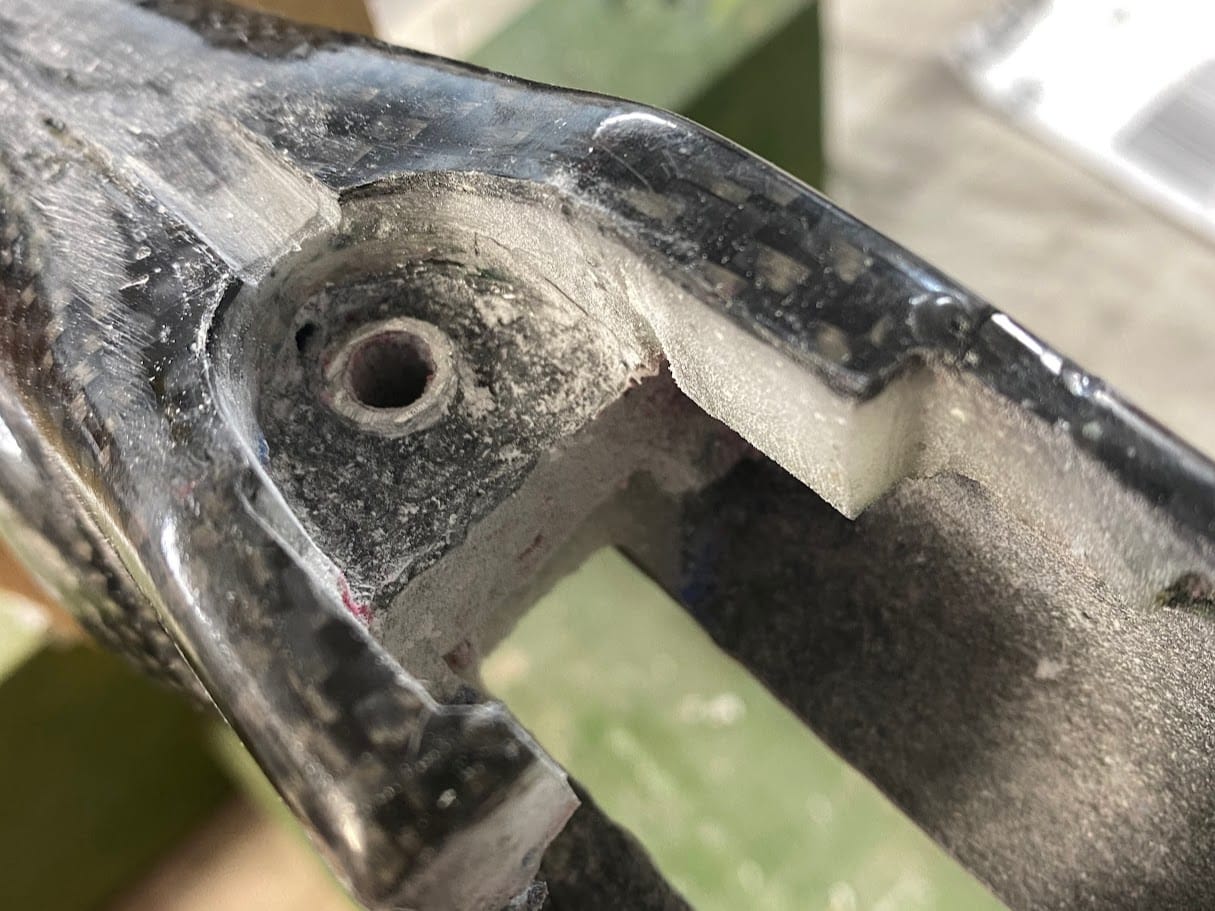
One of the foundations of an accurate rifle is ensuring that the action cannot shift inside the stock.
To achieve this, aluminium bedding pillars were fitted into the stock.
These pillars allow the action screws to clamp against solid aluminium rather than compressing the composite material over time.
For a complete walkthrough of this process, see my article How to do Pillar and Action Bedding.
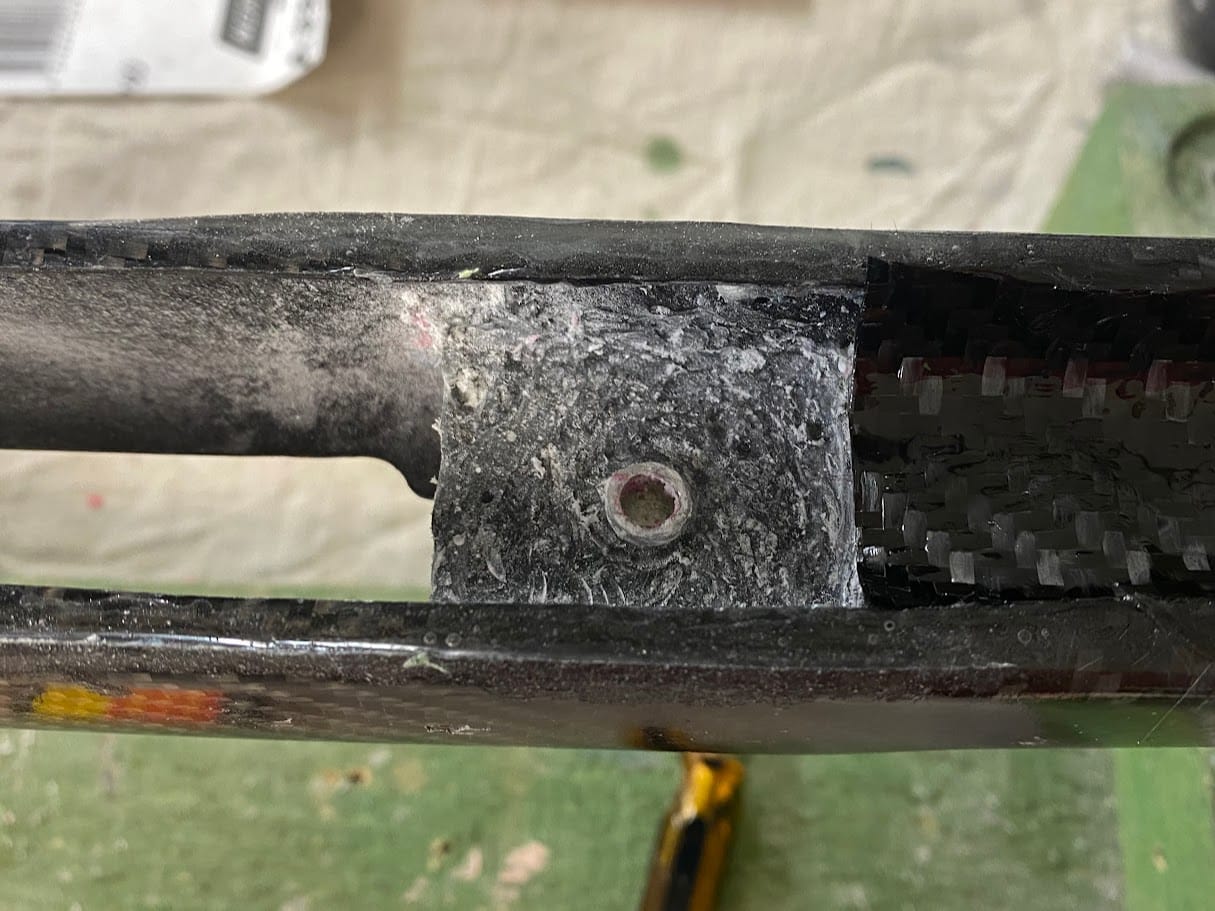
The front pillar was installed using exactly the same approach.
Both pillars were carefully aligned and permanently epoxied into position before moving on to the next critical stage of the build.
That stage would ultimately determine how well the action and stock became one.
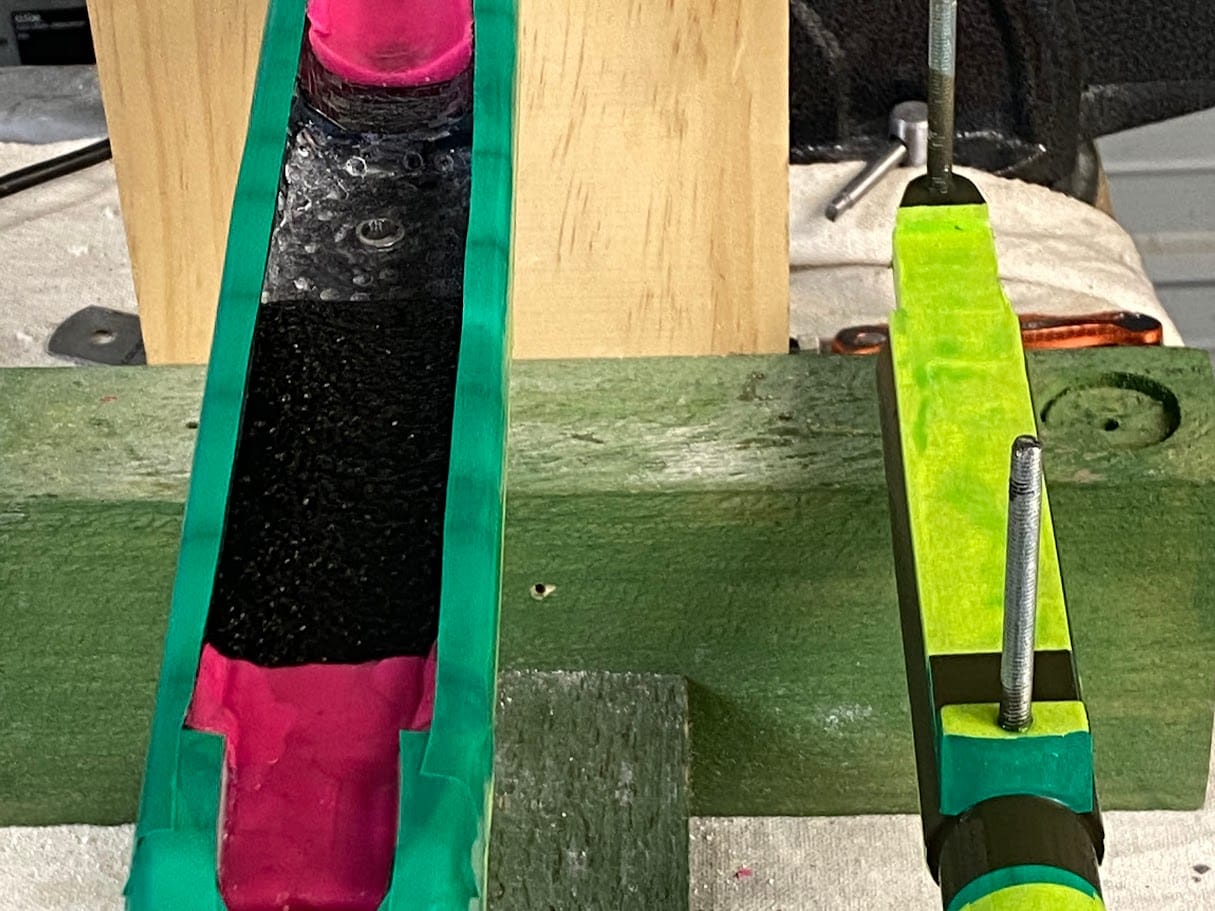
With the pillars installed, it was time for one of the most important steps in the entire build—a full action bedding job.
Rather than repeating the complete process here, I recommend reading my previous article on How to do Pillar and Action Bedding, where I cover every step in detail.
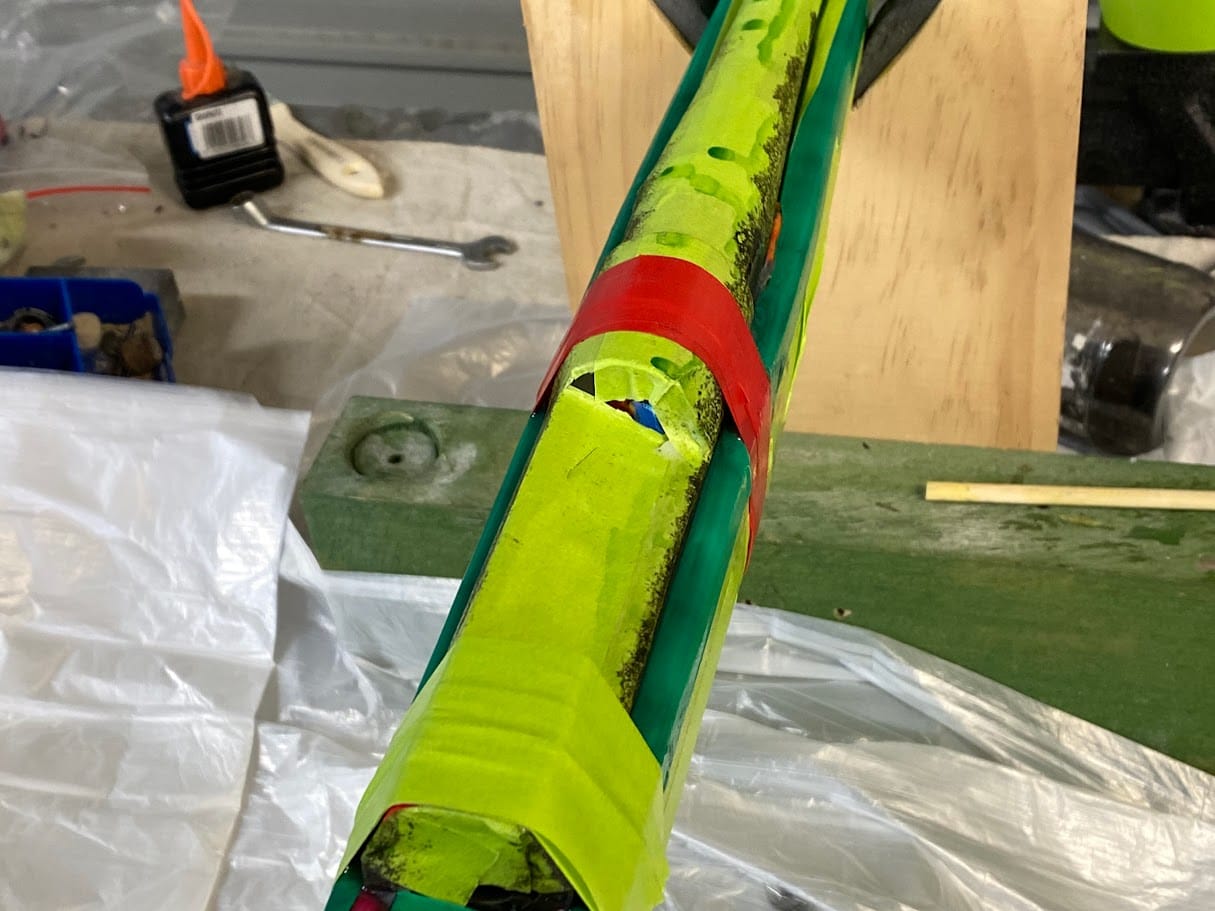
For this project, the objective was simple: create a perfectly matched, non-compressible interface between the rifle action and the stock.
The bedding compound I used was a very dense epoxy mixture with a high metal content. Once cured, it creates a hard and stable support surface that will not compress or give way over time.
The action was carefully prepared using release agent. All areas that should not receive bedding compound were taped off, and temporary guide bolts were fitted through the newly installed pillars.
The stock cavity was then filled with bedding compound before lowering the action carefully into place.
The bedding compound forms around the action like a custom-made glove, creating an exact imprint of that particular action inside the stock.
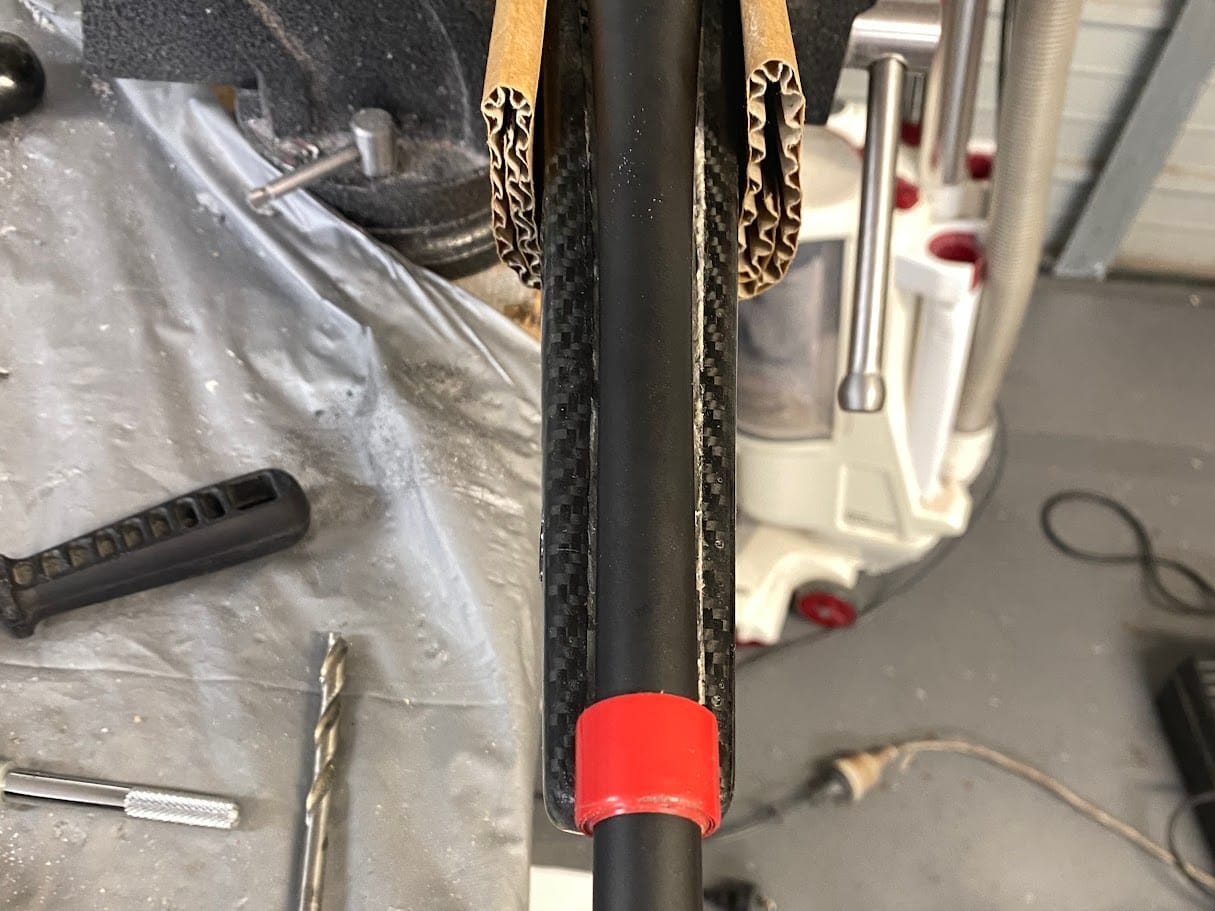
One small detail that often goes unnoticed is correctly positioning the barrel during the bedding process.
You’ll notice electrical tape wrapped around the barrel in one of the photographs. This isn’t there by accident.
The tape centres the barrel perfectly within the barrel channel while the bedding compound cures. It ensures the action sets exactly where it should, producing an even barrel gap and a truly free-floating barrel.
Sometimes it’s the simplest tricks that make the biggest difference.
💡 Workshop Tip
Don’t rush a bedding job. Once the action is lowered into the compound, let the epoxy do the work. Disturbing it before it has fully cured can undo hours of careful preparation.
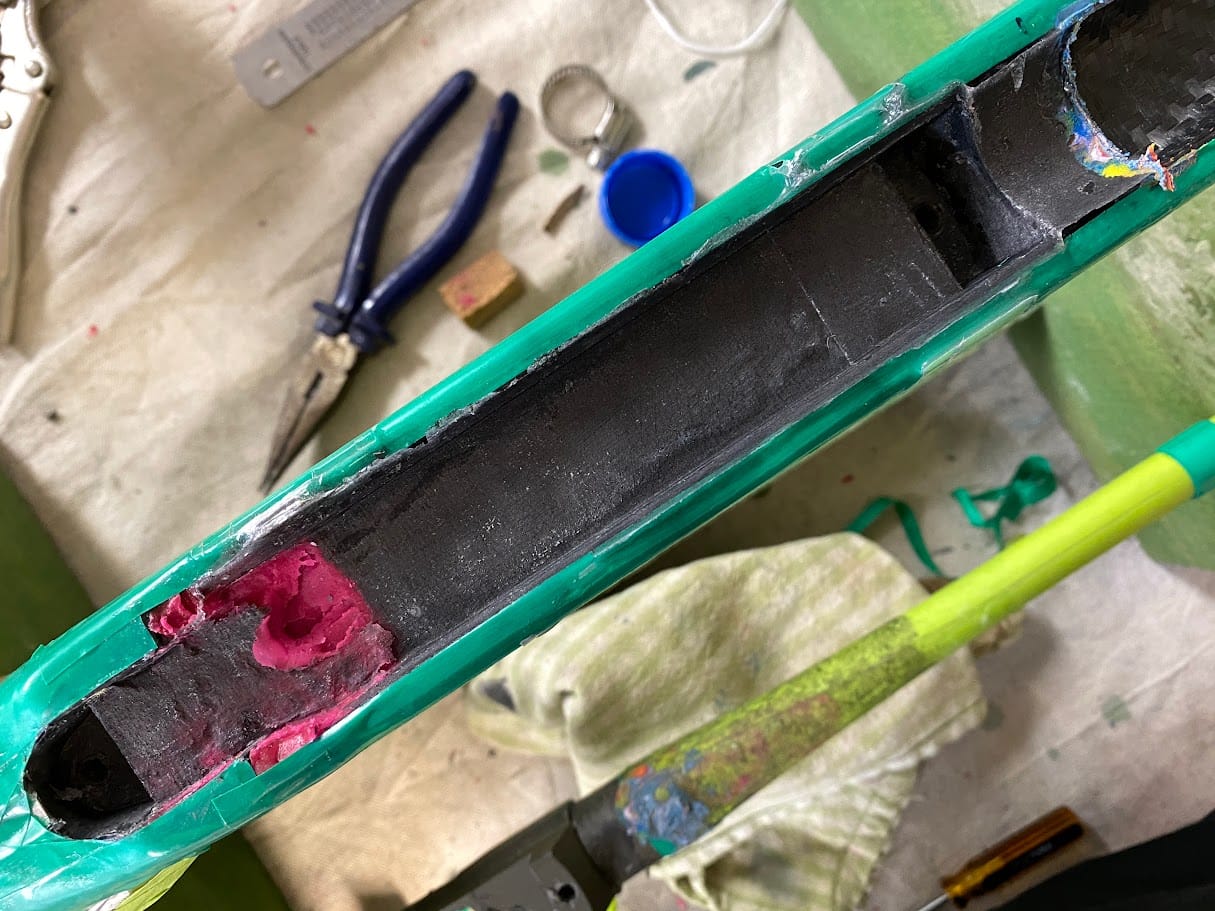
Once the bedding compound had cured, the action was removed and cleaned.
The result was a perfectly matched imprint of that specific action inside the stock.
The aluminium pillars provide the solid metal surfaces for the action screws to clamp against, while the bedding compound supports the shape of the action itself.
Together, they create a rigid and repeatable interface that should not compress or shift over time.
From this point onwards, every time the action is installed it returns to exactly the same position.
That consistency is one of the foundations of precision shooting.
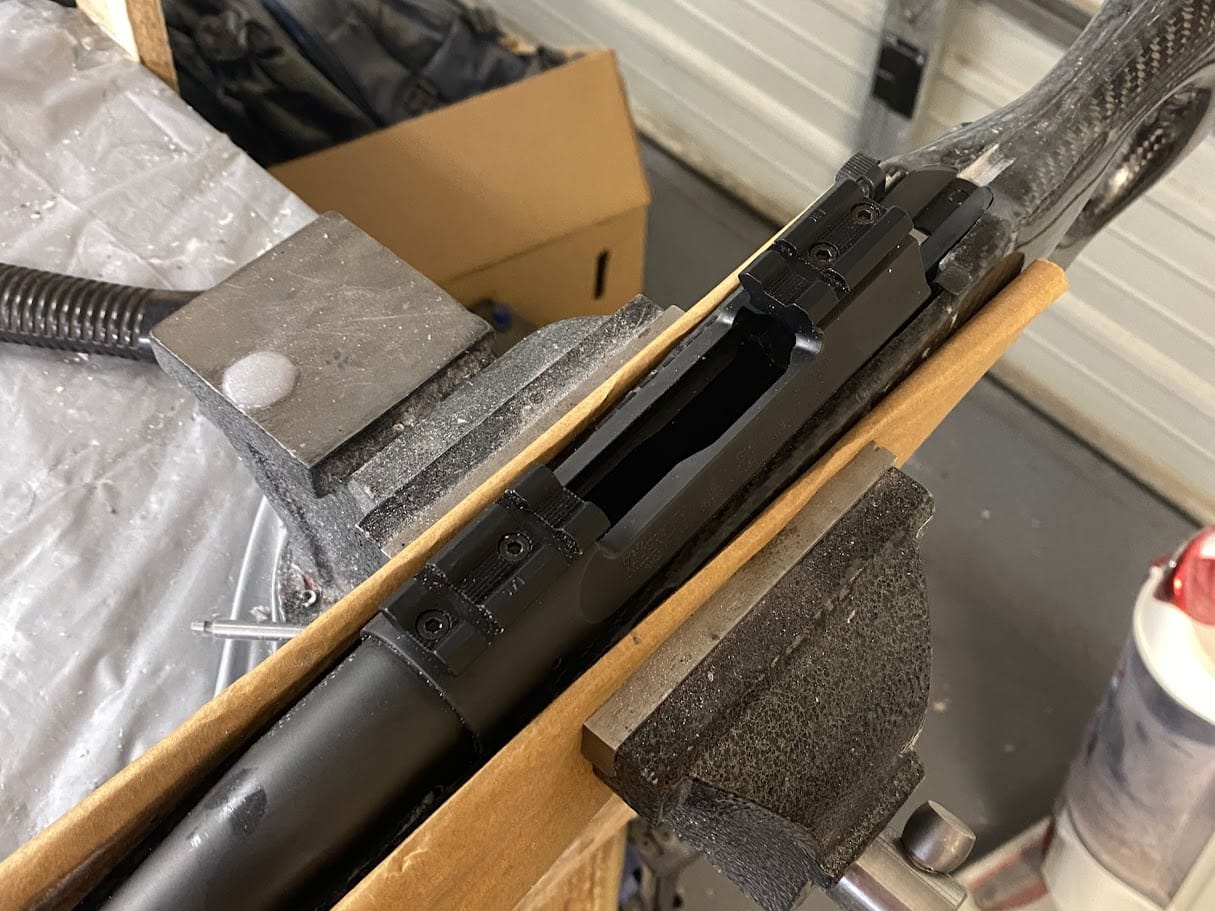
With the bedding completed, final fitting could begin.
The action now fitted exactly where it should, but there was still plenty of careful machining required before every external component would sit neatly inside the stock.
The openings around the action, barrel and trigger assembly were slowly refined until everything fitted cleanly.
This wasn’t a race.
This was one of those stages where removing half a millimetre too much would be obvious every time I picked up the rifle.
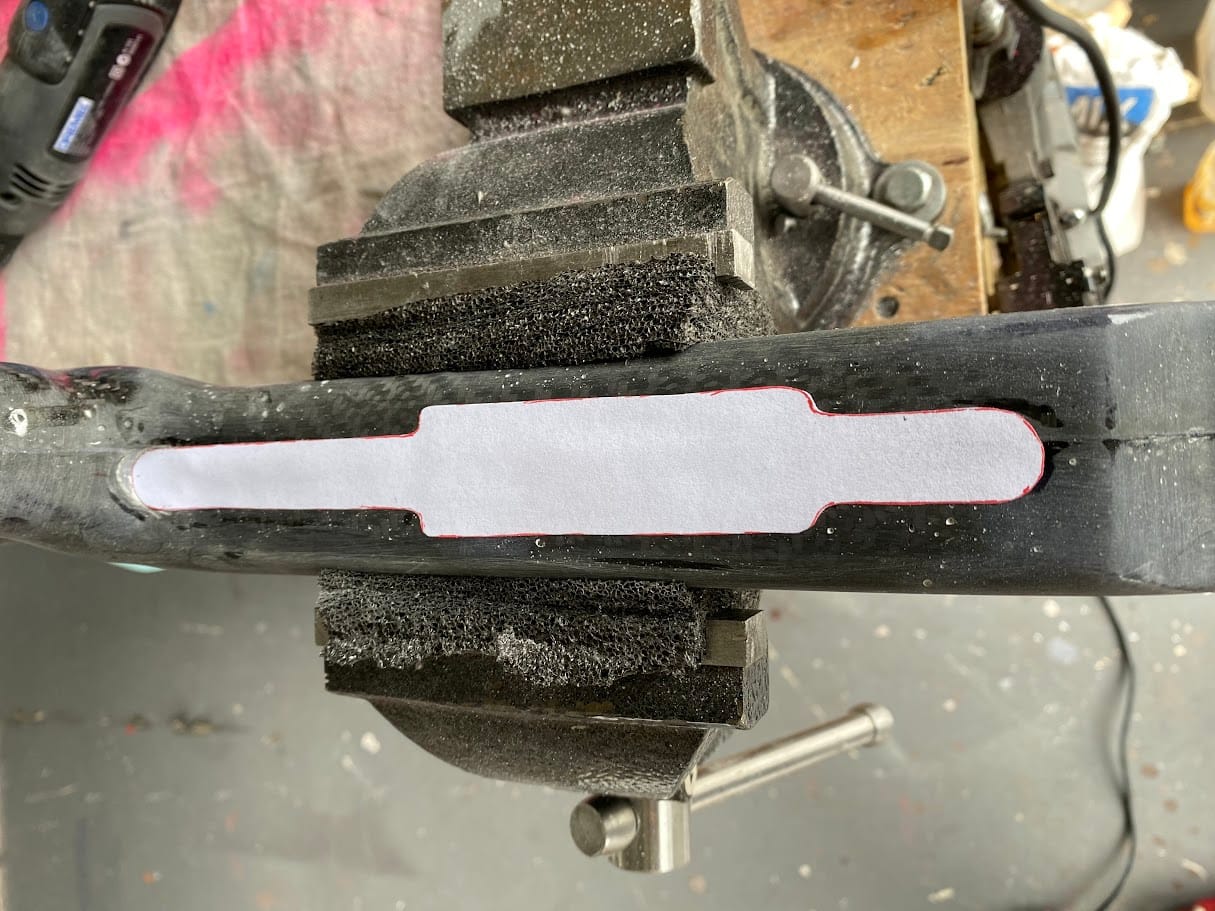
The trigger guard and magazine assembly required careful recessing into the bottom of the stock.
These are some of the most visible parts of the finished rifle.
A poorly fitted trigger guard immediately catches the eye, while a clean, even fit almost disappears into the stock.
It’s amazing how much difference these small details make to the finished appearance.
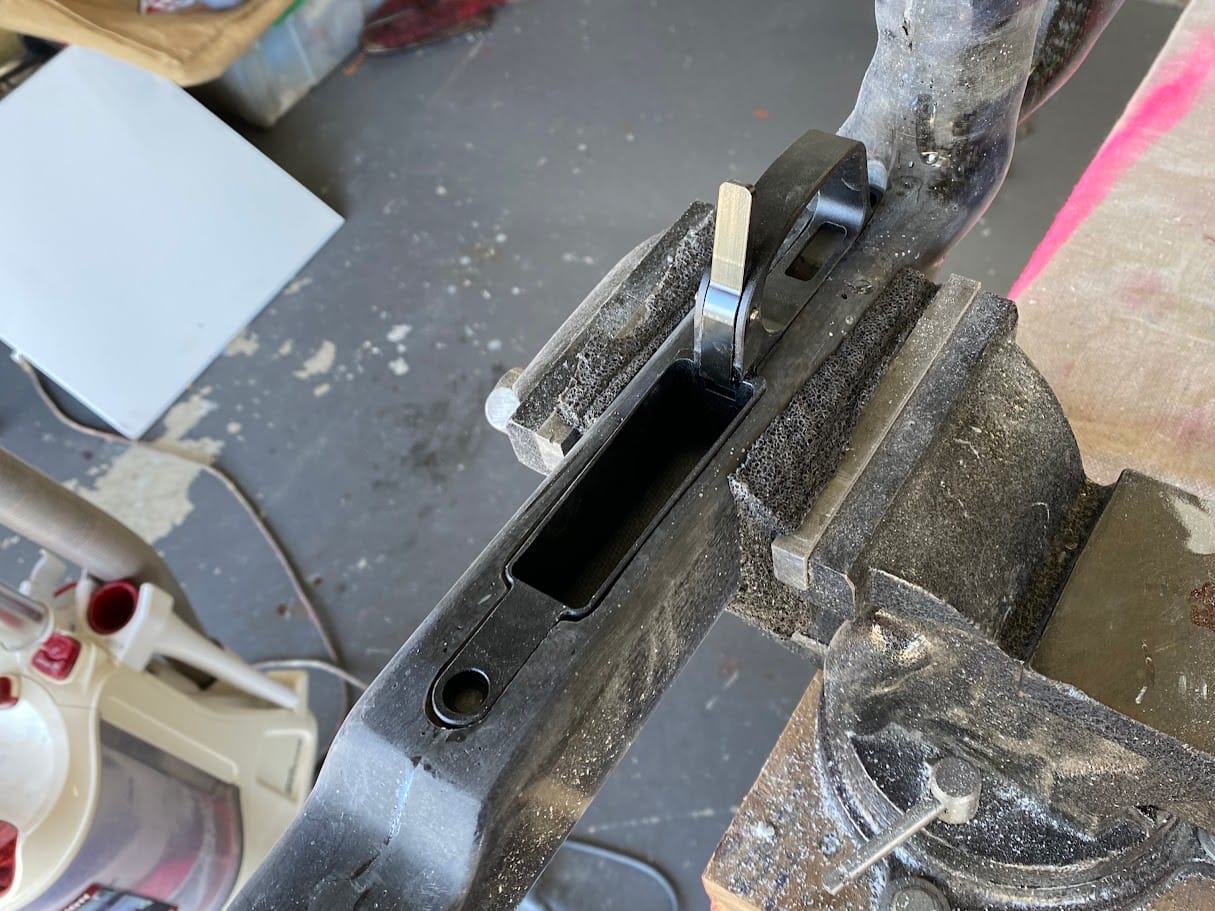
After a lot of trial fitting, filing and sanding, everything finally came together.
The trigger guard sat flush.
The magazine fitted correctly.
The action dropped neatly into place.
The stock was finally starting to look less like a project and more like a rifle.
💡 Workshop Tip
Before calling the fitting complete, load a few inert dummy rounds into the magazine and cycle them through the action using the bolt. This confirms that the magazine height, feed angle and action alignment are correct. The last thing you want is to discover a feeding problem when you need the rifle to work.
At this stage all the machining work was complete.
Before final assembly, I wanted to protect every exposed metal components.
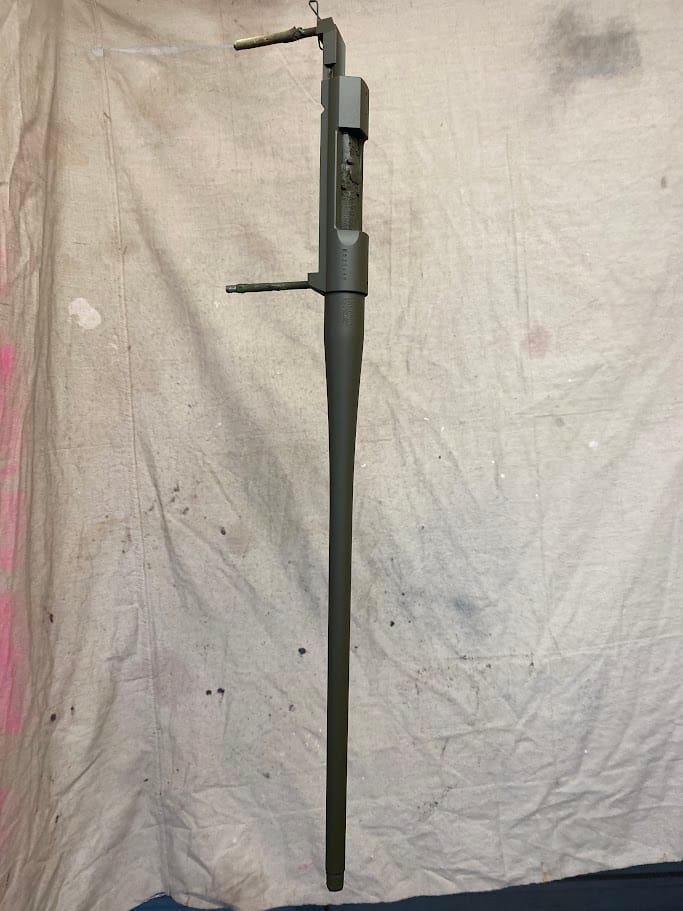
Traditional bluing certainly has its place, but for this rifle I wanted something that would better withstand the rough treatment that a hunting rifle inevitably receives.
None of my rifles have ever been safe queens.
They’re working tools.
That meant they had to survive rain, river crossings, scrub, rocks and the occasional knock against a tree.
For that reason I chose DuraCoat.
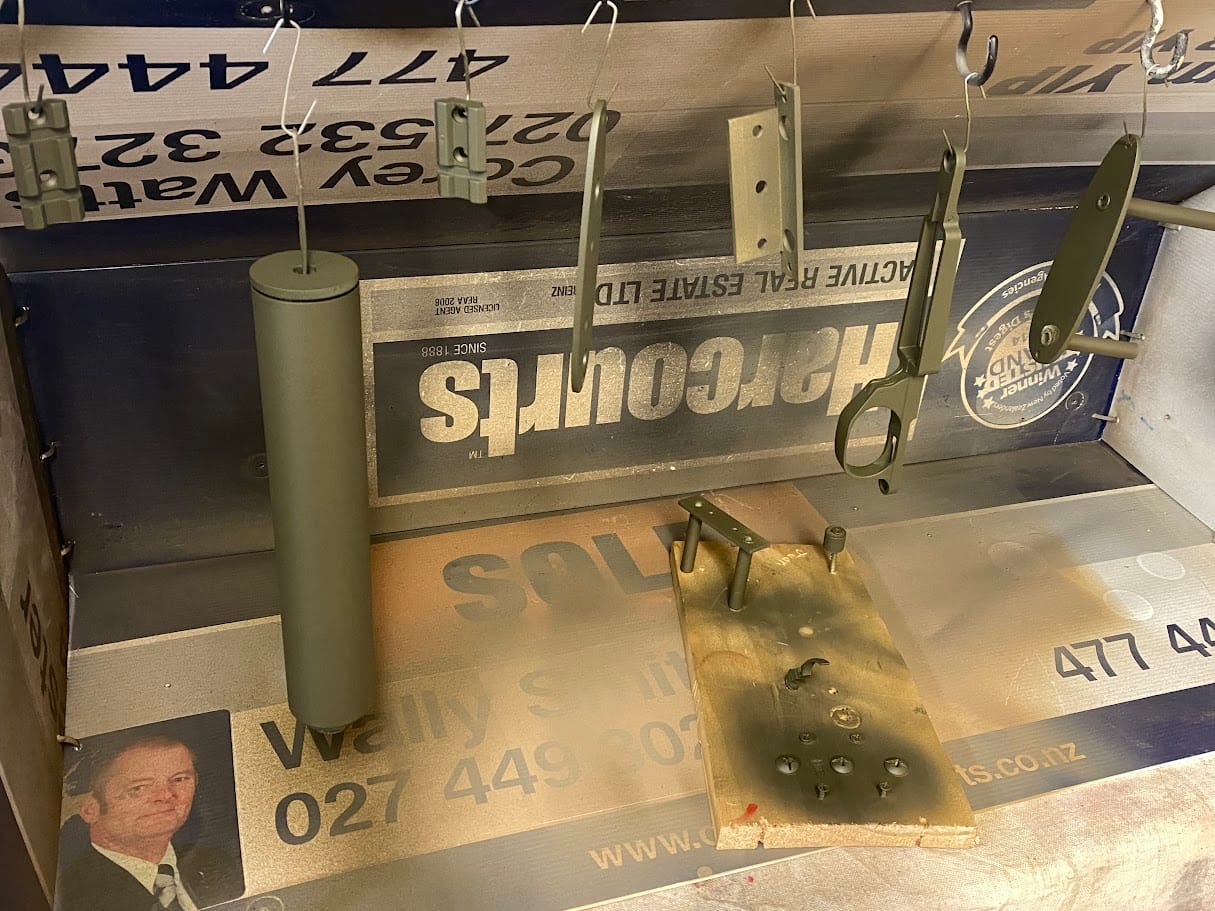
Every metal component—including the barrel, action, trigger guard, suppressor and various smaller parts—received the same treatment.
Once fully cured, DuraCoat forms a tough protective finish that resists corrosion and scratches while requiring very little maintenance.
For a rifle that spends most of its life outdoors, that extra protection is well worth the effort.
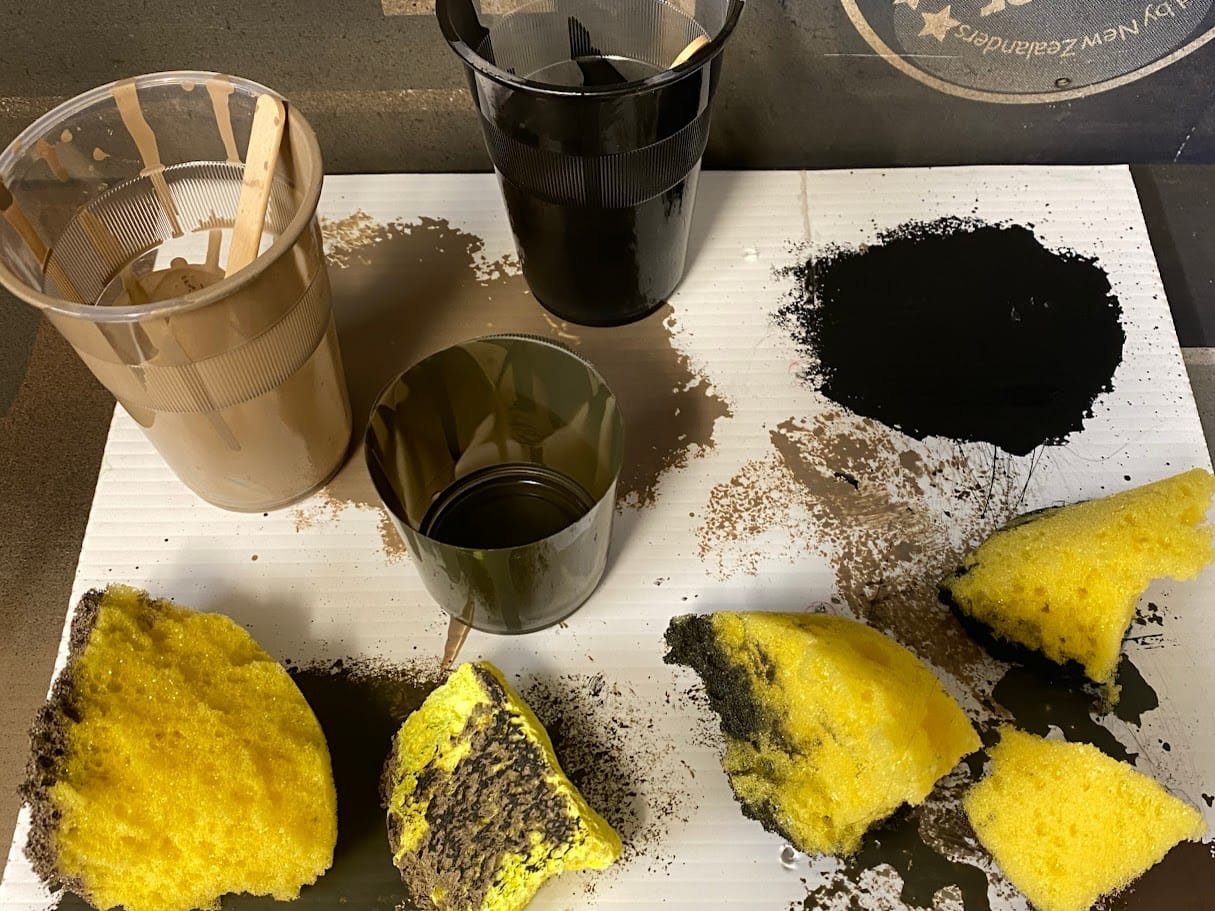
Although I enjoy the appearance of exposed carbon fibre, this rifle was built as a hunting rifle.
I wanted it to blend into its surroundings while still allowing some of the carbon fibre weave to remain visible.
Rather than applying a traditional camouflage pattern, I created my own finish using small pieces of sponge and several different colours mixed in small batches.
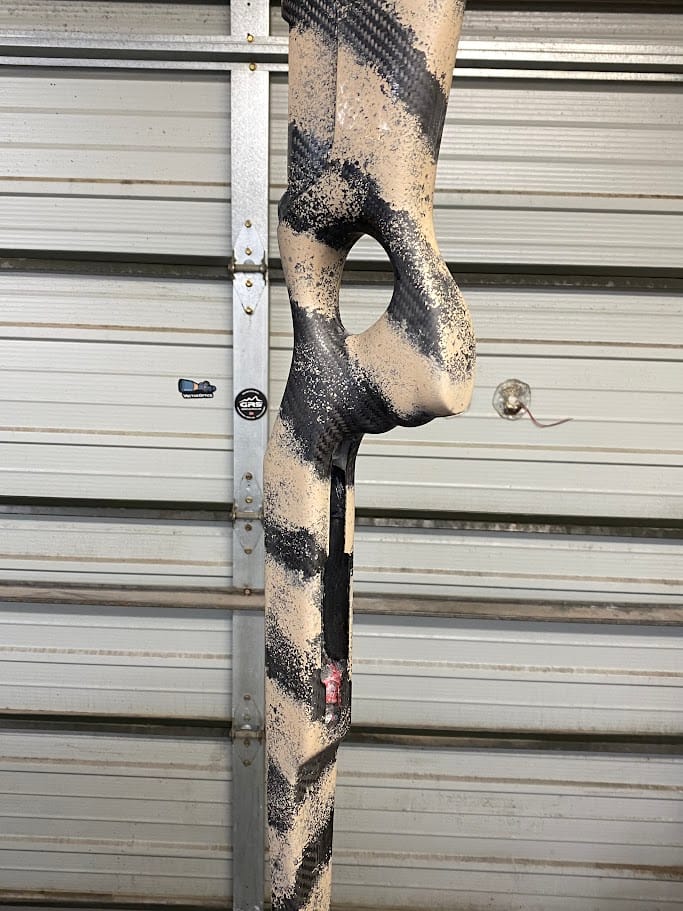
The lightest colour was applied first.
Using a sponge instead of a spray gun created a far more natural pattern than I could have achieved with masking tape.
This first layer established the overall appearance without completely hiding the carbon fibre underneath.
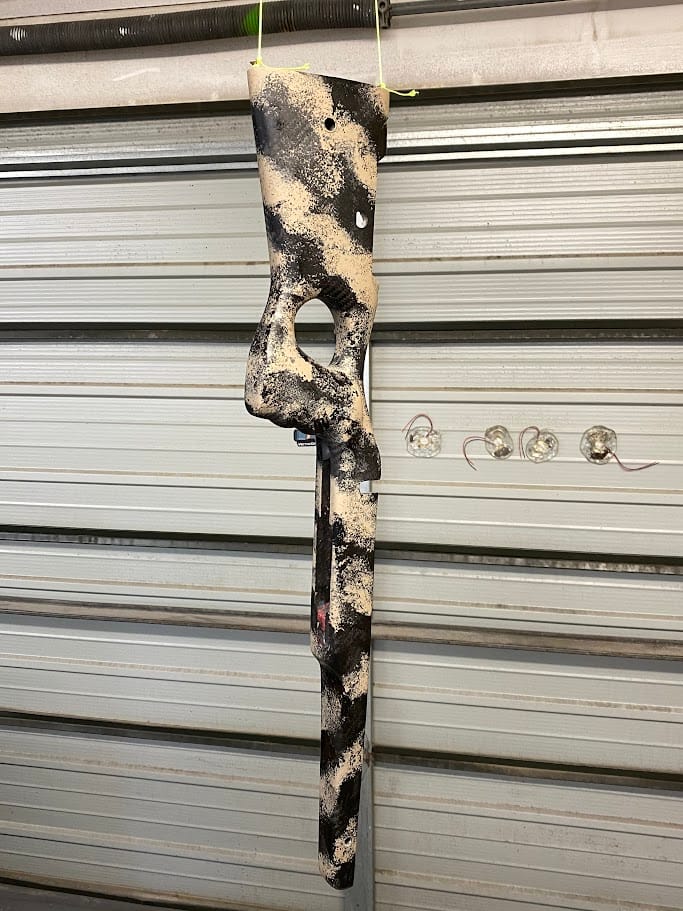
Once the first layer had cured, progressively darker colours were added.
The objective wasn’t to copy a commercial camouflage pattern.
It was simply to build up natural-looking layers while controlling how much of the carbon fibre remained exposed.
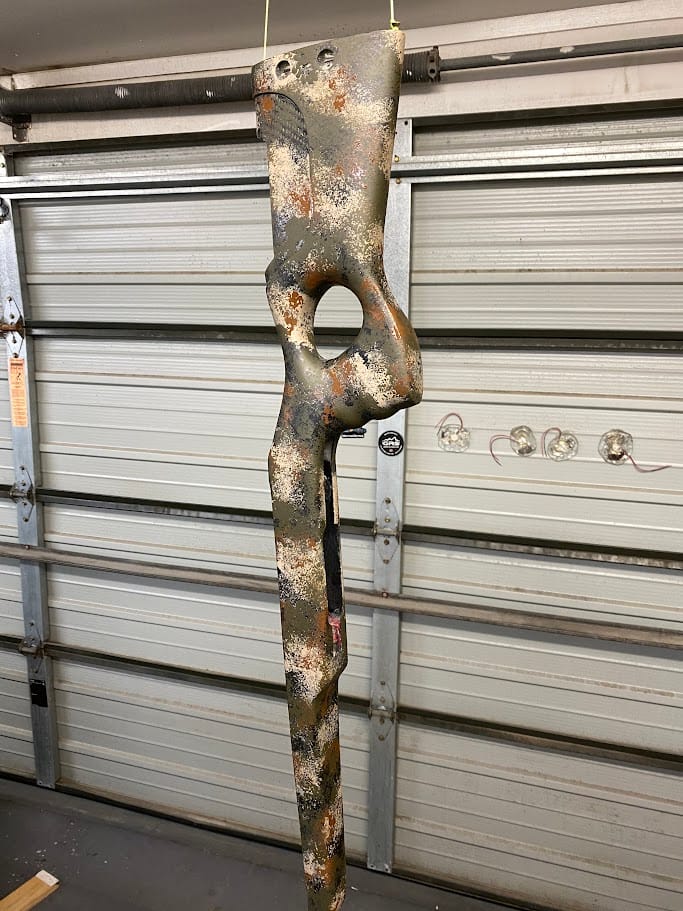
Additional greens were introduced to help break up the outline of the rifle.
Each layer was built gradually.
Stand back.
Look.
Add another little bit.
Stand back again.
It’s a process that can’t be rushed.
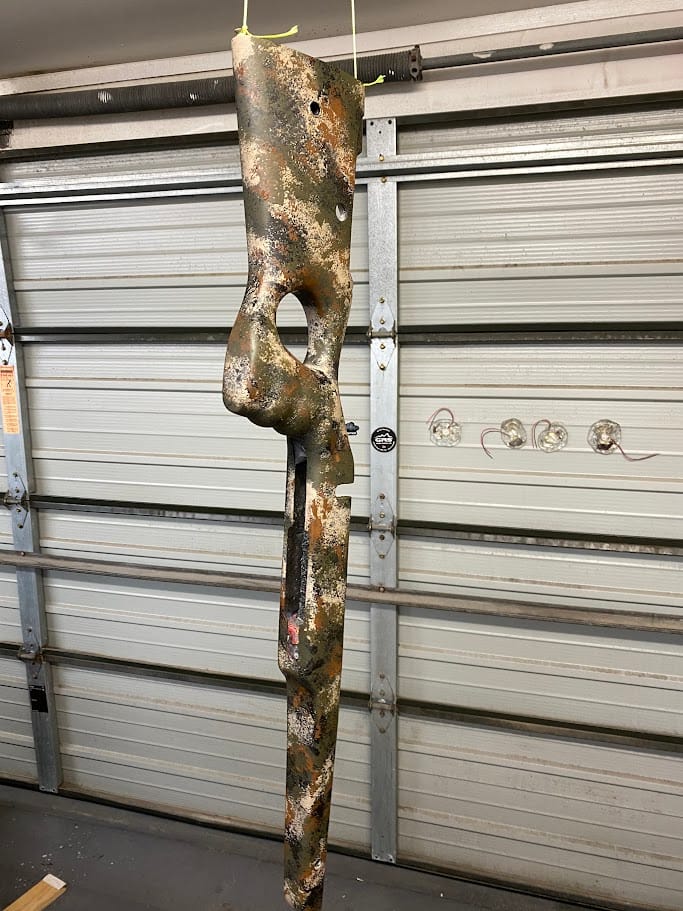
The final colour added some warmer tones to balance the overall finish.
By this stage the camouflage had developed real depth while still allowing parts of the carbon fibre weave to show through.
Every stock ends up slightly different, which is part of what makes a custom build special.
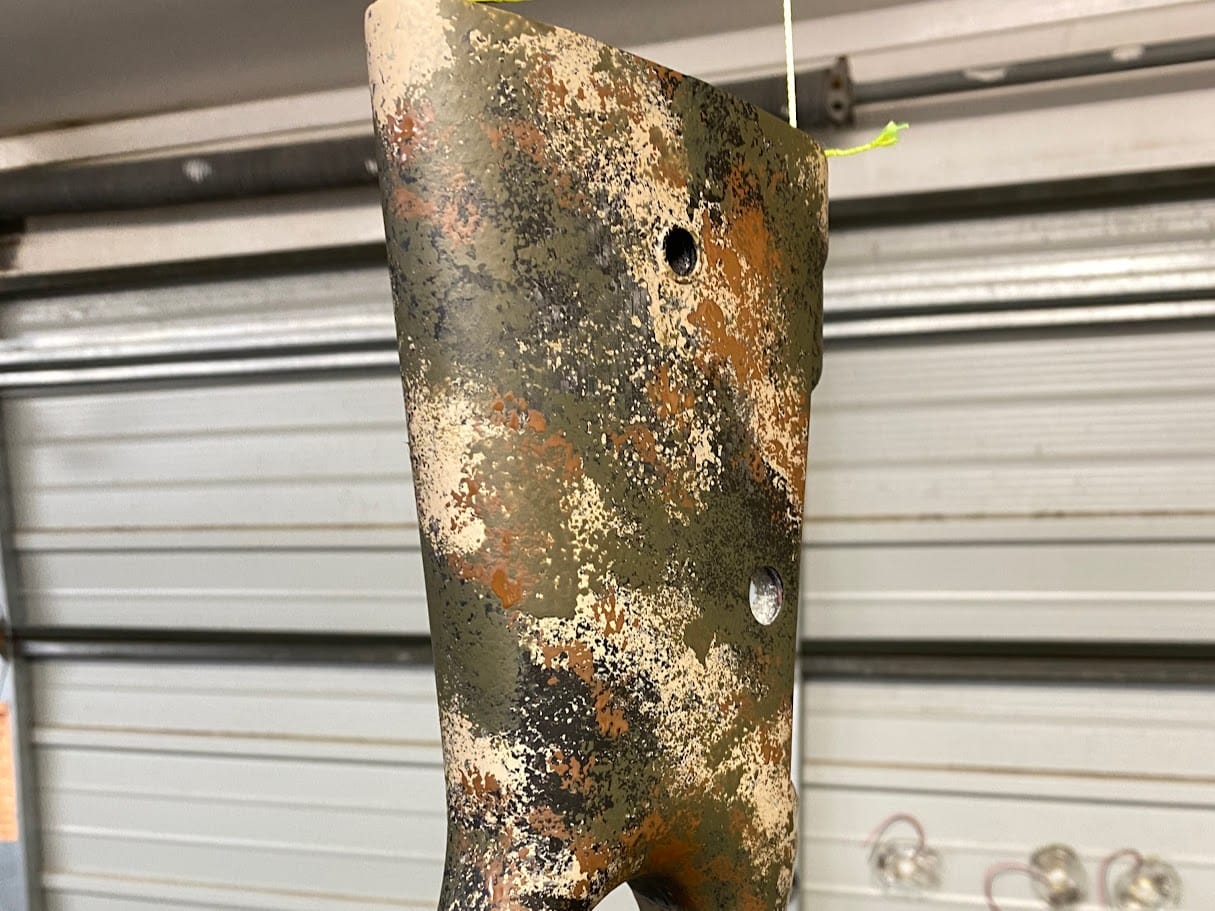
Once I was happy with the finish, the entire stock received several coats of Rust-Oleum UV-resistant matte clear coat.
I chose Rust-Oleum because it provides a hard-wearing protective finish, and the UV protection helps prevent the colours from fading after extended exposure to sunlight.
The matte finish was also a deliberate choice. A gloss finish may look good, but this is a hunting rifle. I did not want a shiny surface reflecting sunlight while moving through the bush or forest and giving away my position.
Besides protecting the paintwork, the clear coat brought the colours to life and made the exposed carbon fibre weave really stand out.
This was the point where the stock truly came alive.
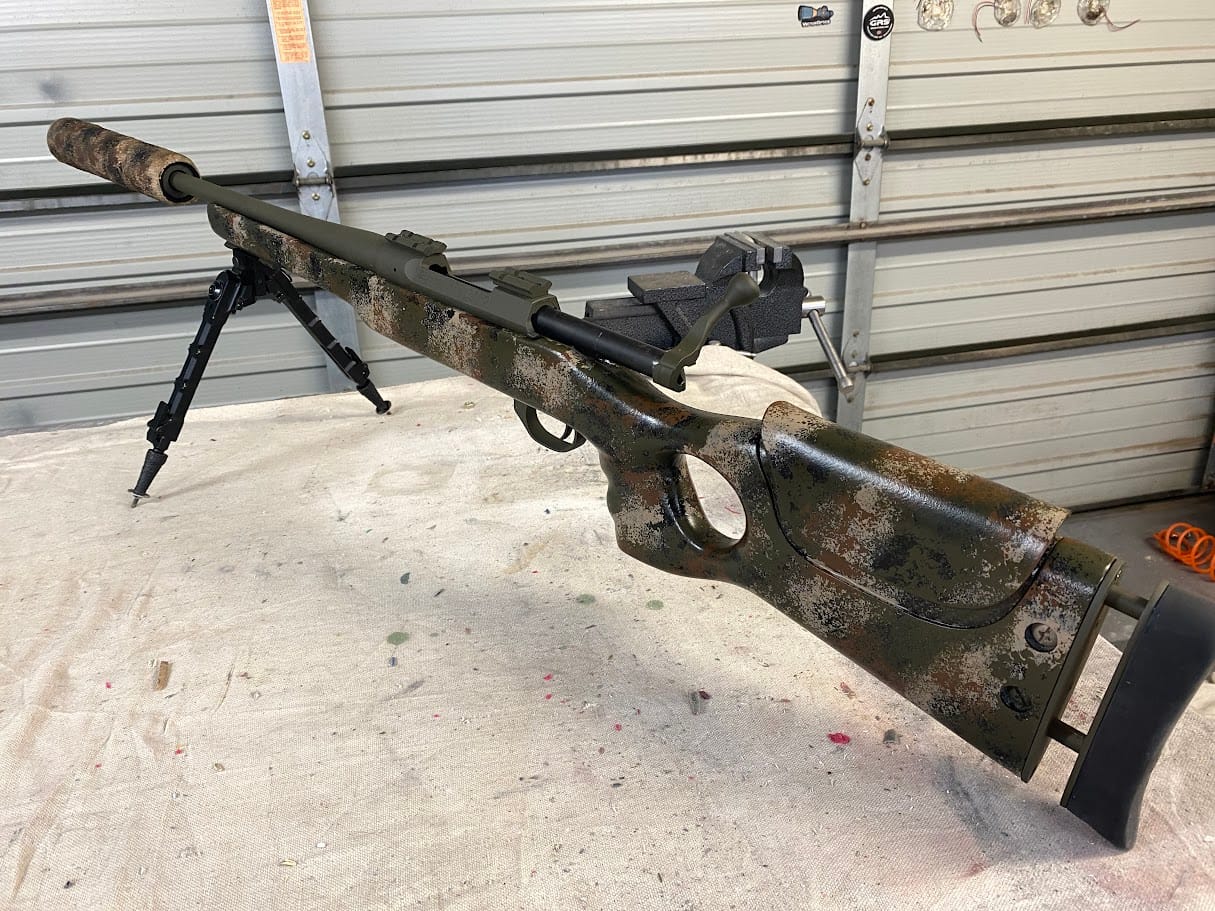
Finally, everything came together.
The action.
The barrel.
The trigger assembly.
The adjustable cheek rest.
The adjustable length of pull.
Months of work had finally become a complete rifle.
Standing back and looking at it for the first time made every late night in the workshop worthwhile.
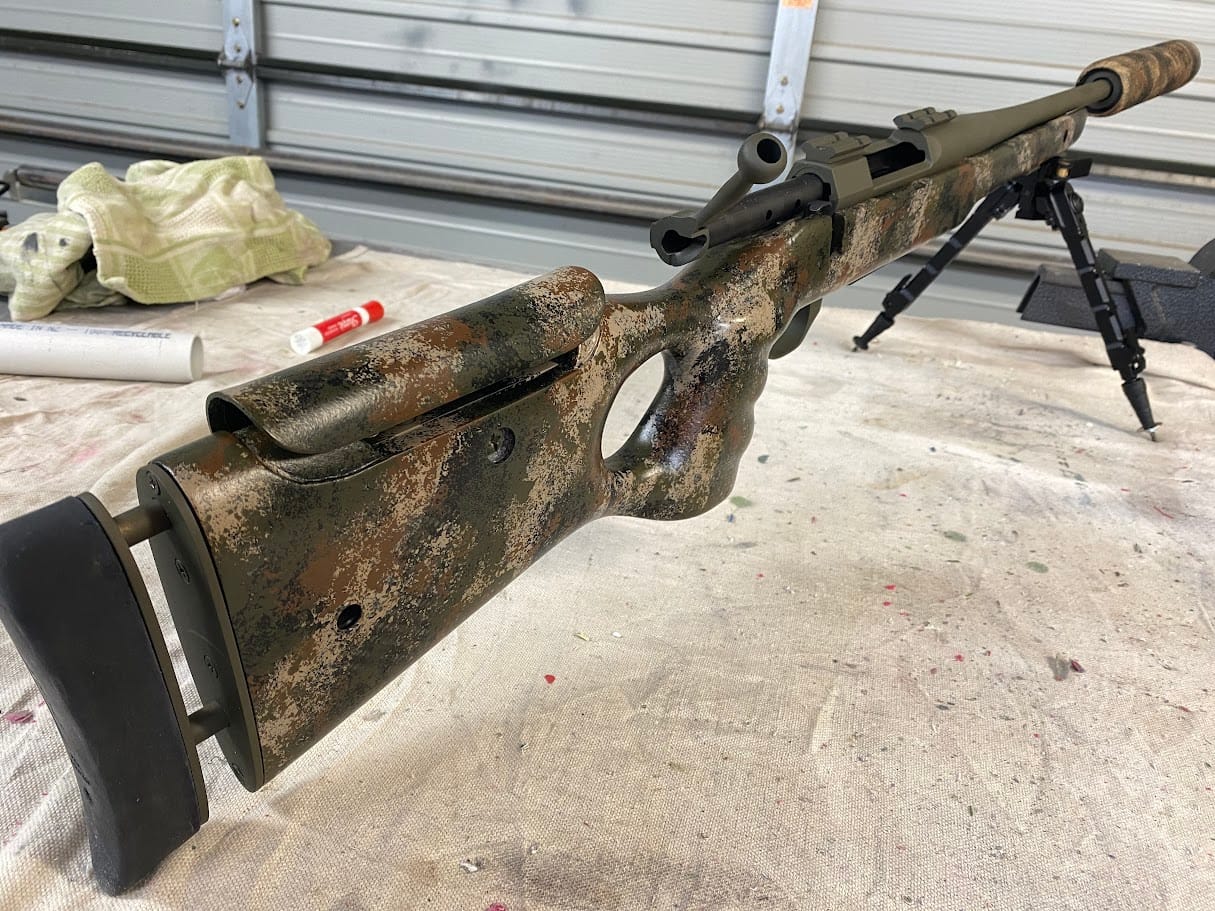
From every angle it was exactly what I had set out to build.
Not somebody else’s idea of the perfect rifle.
Mine.
One that fitted me, balanced the way I wanted, and was built for the type of shooting I enjoyed most.
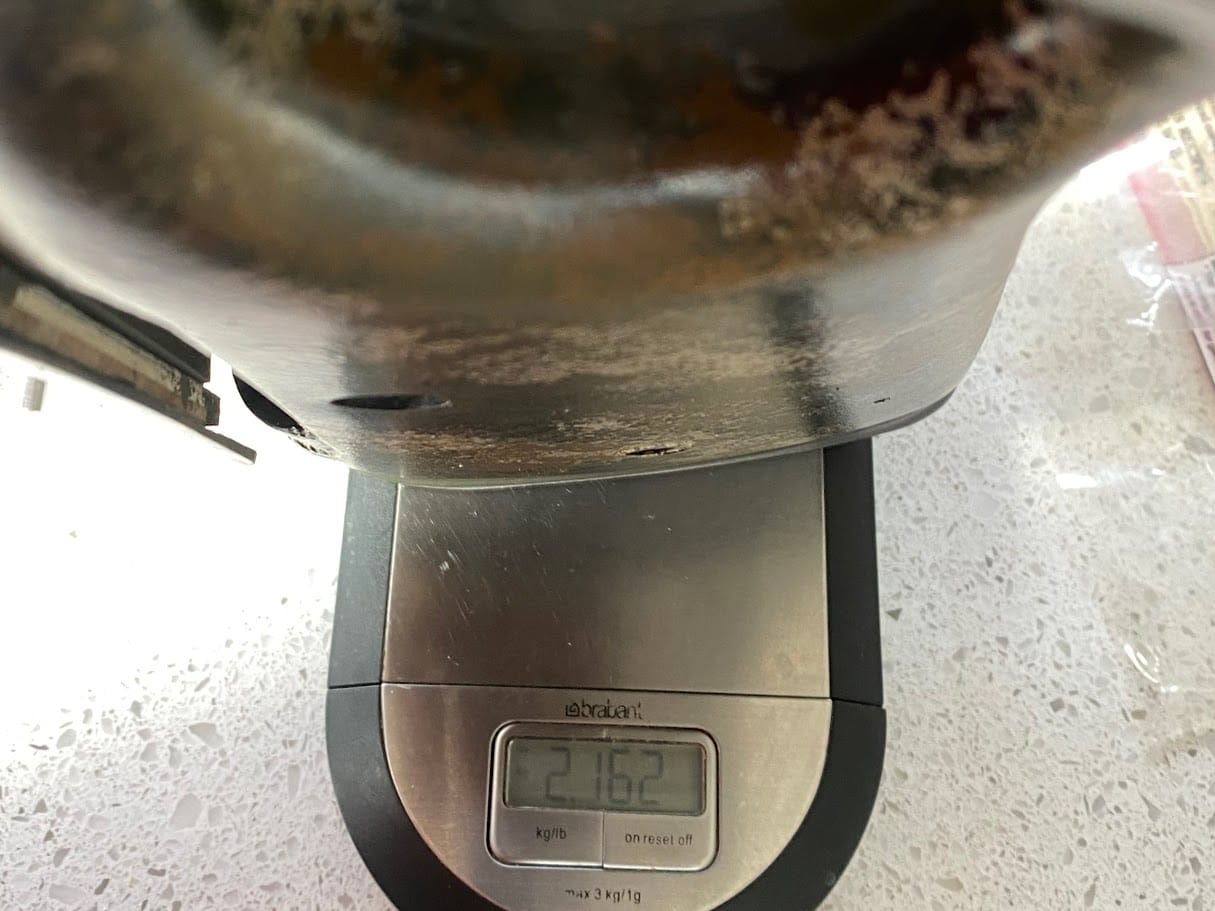
Without the scope or bipod installed, the completed rifle weighed 2.162 kg.
Some shooters prefer a heavier rifle to help absorb recoil, but this rifle was designed as a hunting rifle first and foremost.
Light enough to comfortably carry all day.
Strong enough to withstand years of use.
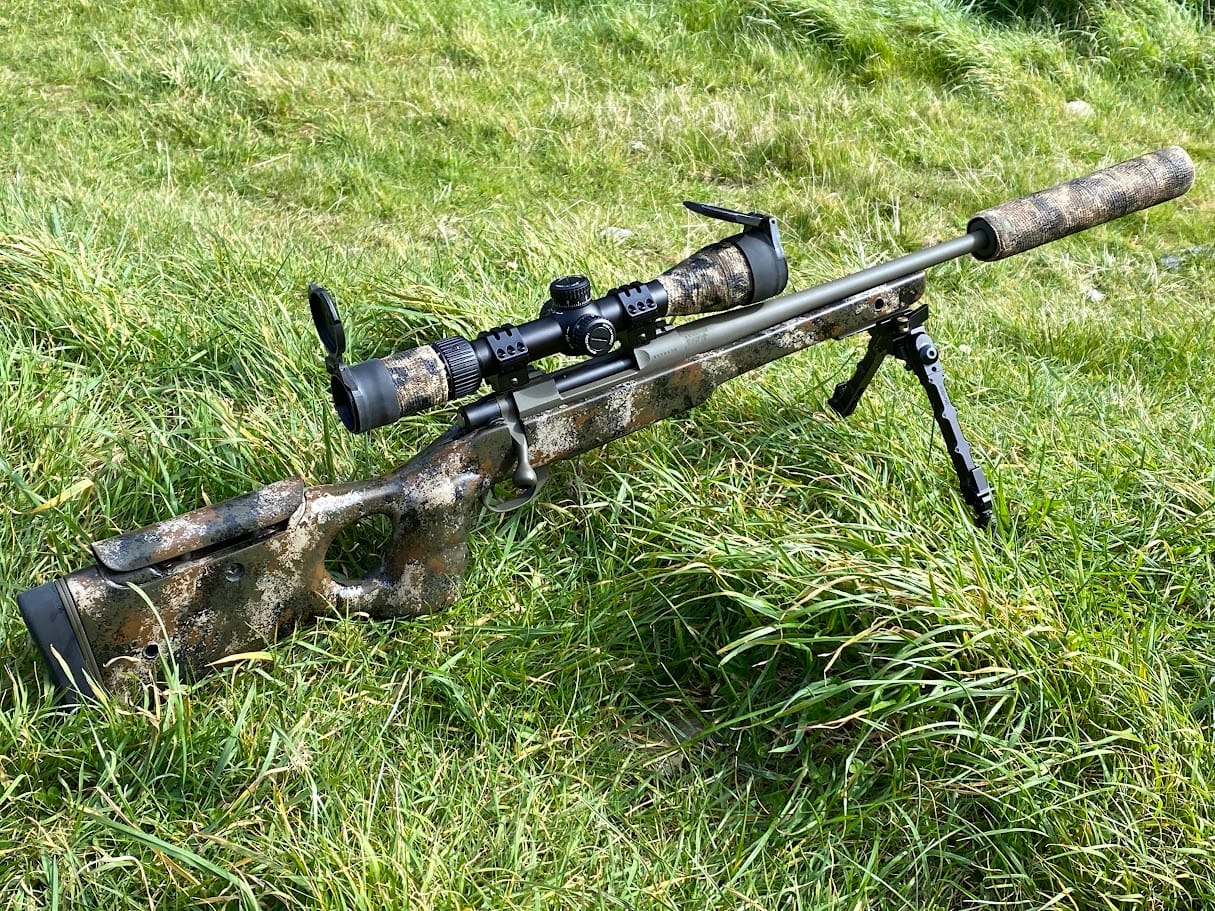
Building a rifle is one thing.
Putting it to work is something completely different.
This rifle wasn’t built to spend its life inside a gun cabinet.
It was built to be carried.
To be used.
To become a trusted companion in the field.
That’s exactly what it did.
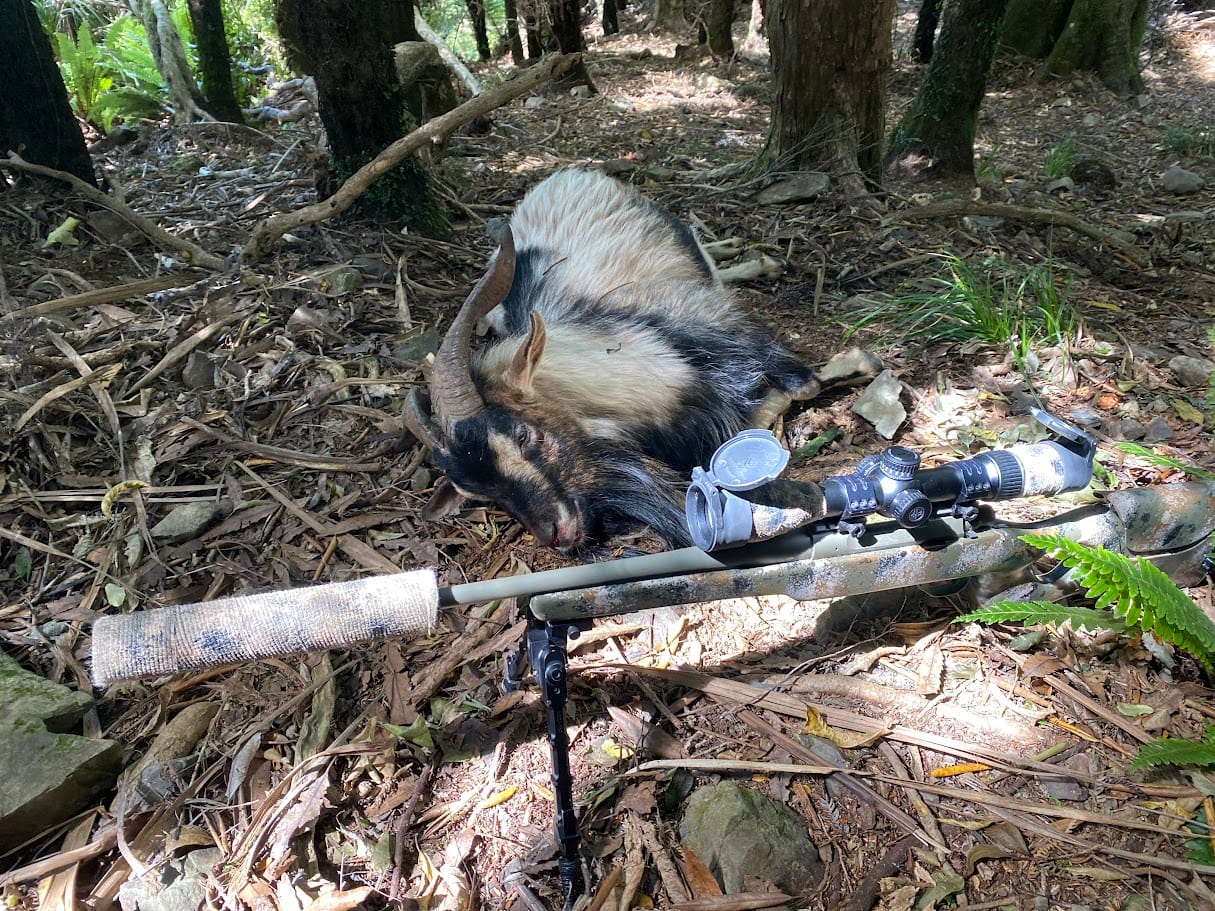
One of the first places this rifle proved itself was in the Muka Muka Block near Wellington, New Zealand.
Working alongside members of the New Zealand Deerstalkers Association and the Department of Conservation, we assisted with pest control by culling feral goats.
Without natural predators, feral goat populations can cause significant damage to native bush, making controlled culling an important conservation activity.
This photograph shows one of those successful hunts.
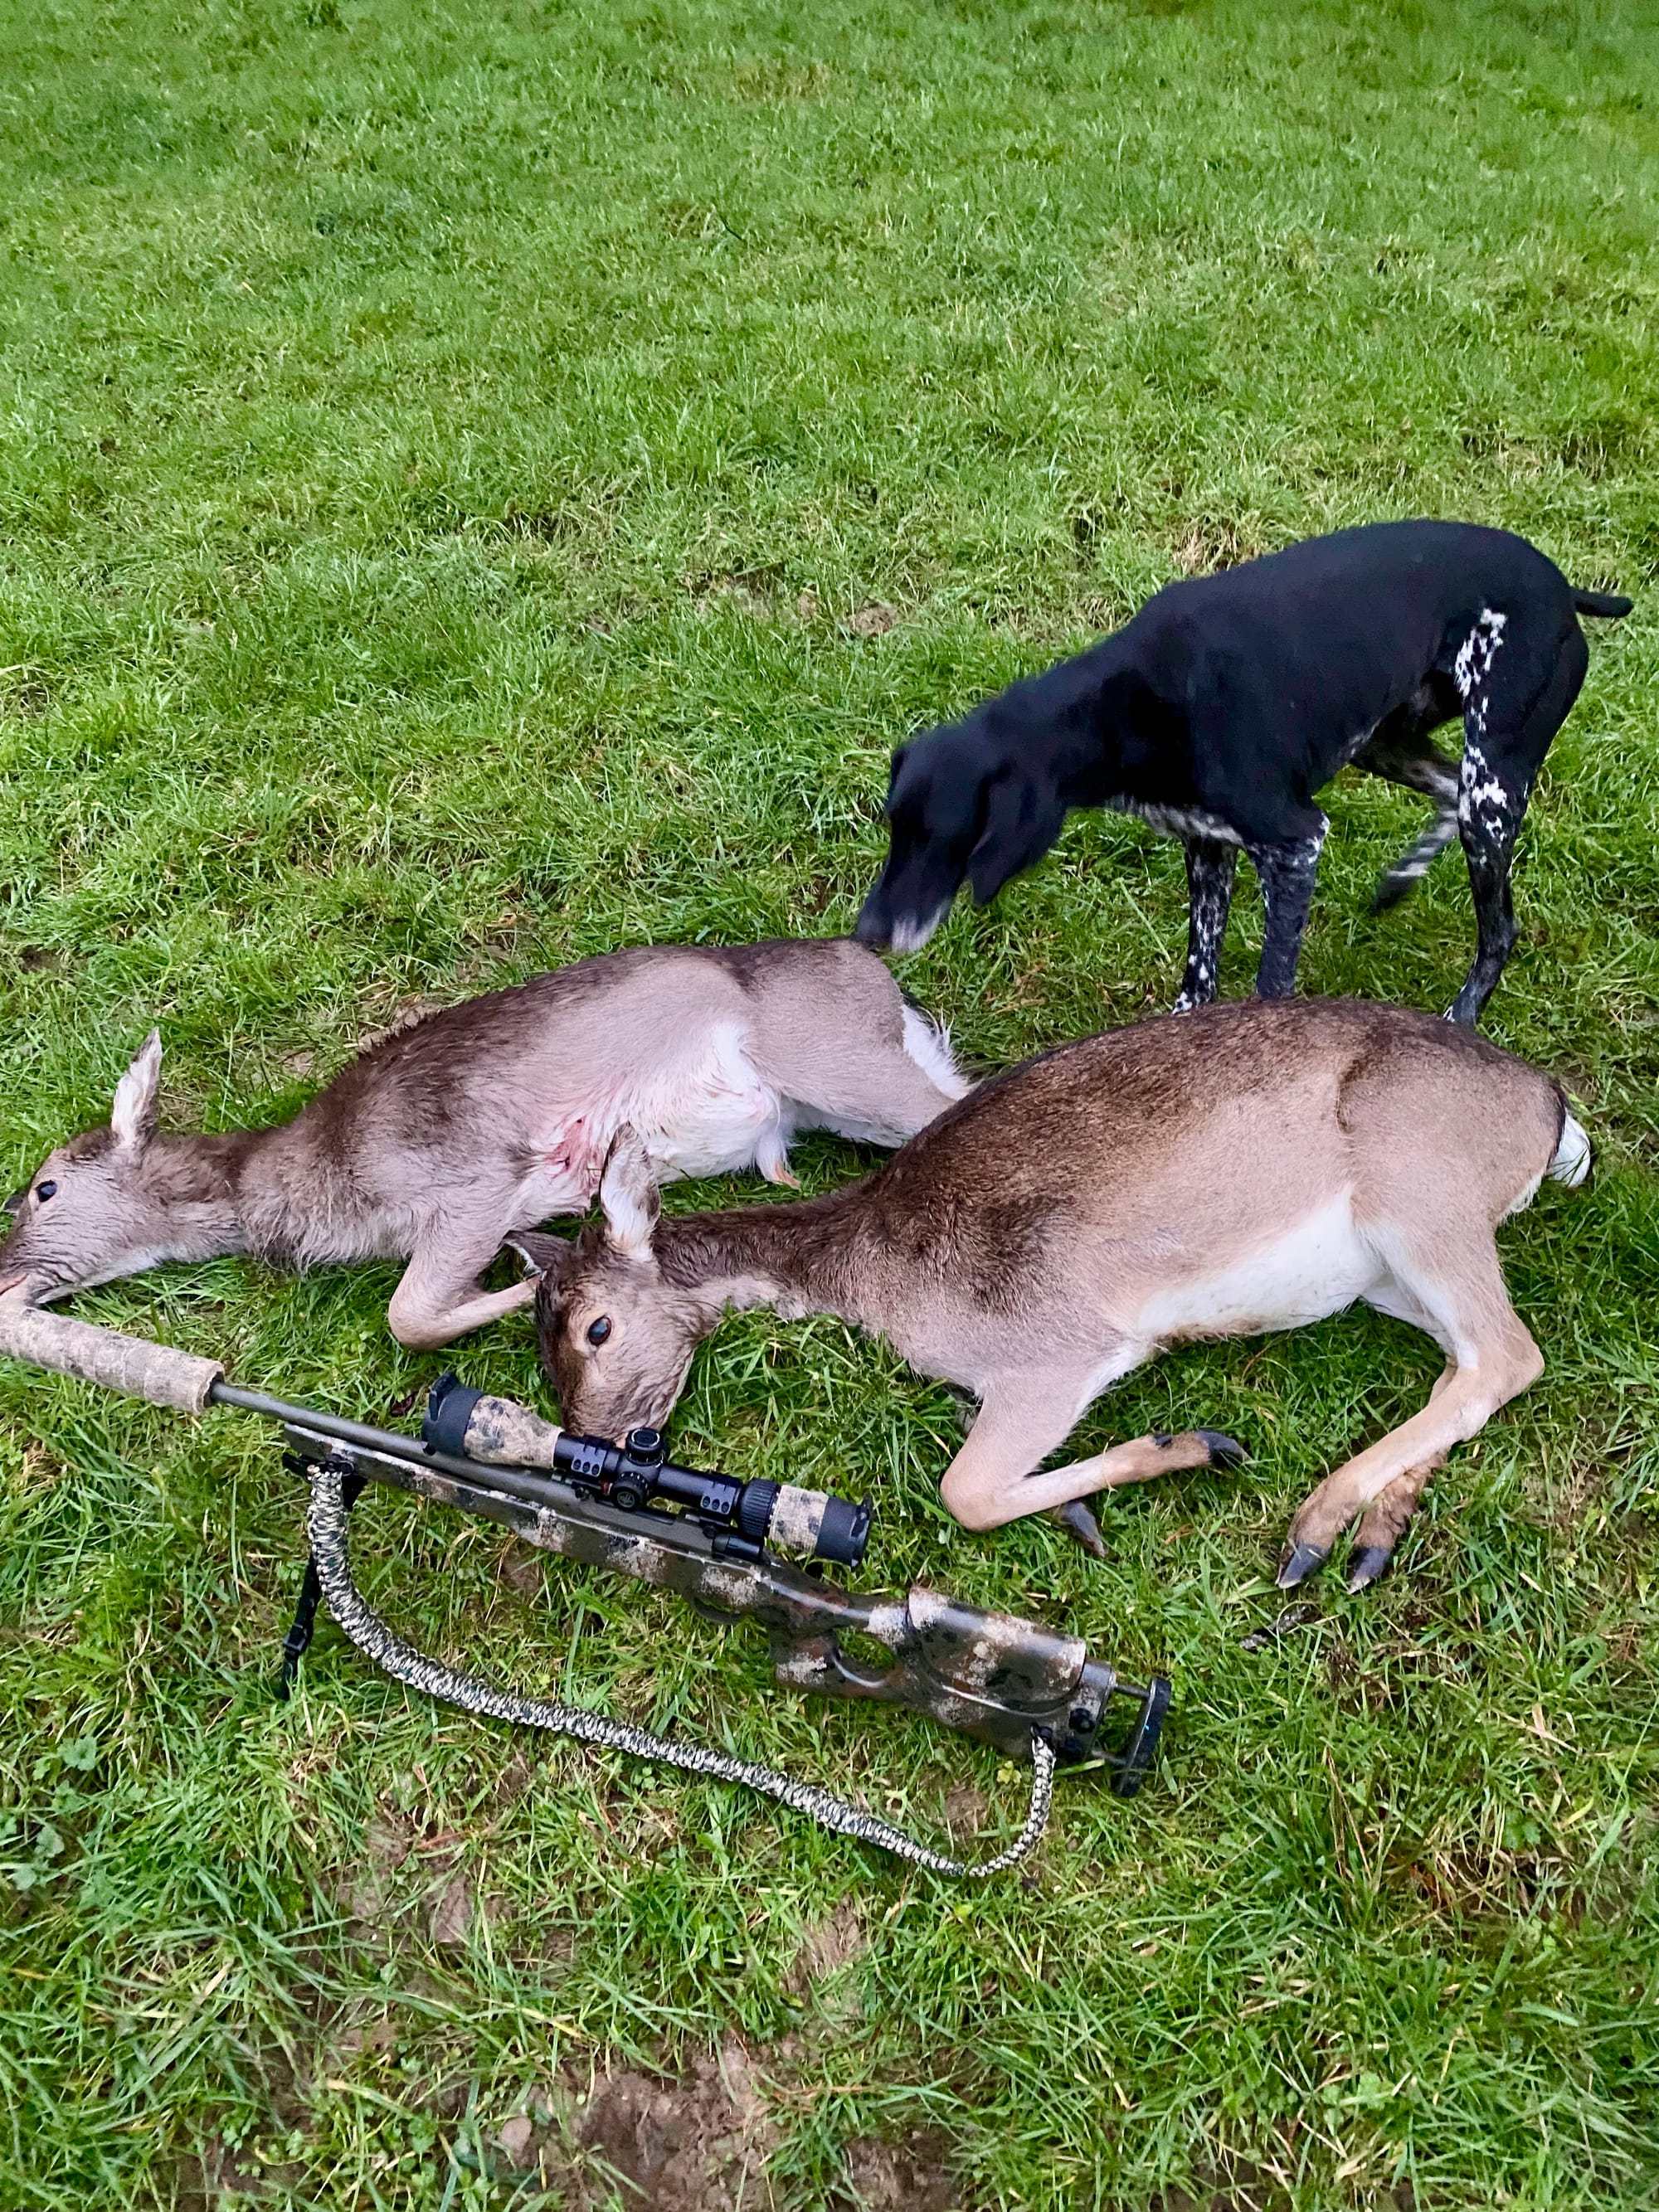
Another one of my regular hunting spots in the Waikato region delivered many Fallow deer biltong and free range meat for the pot.
For me, there is no better test of a hunting rifle than using it for the job it was designed to do.
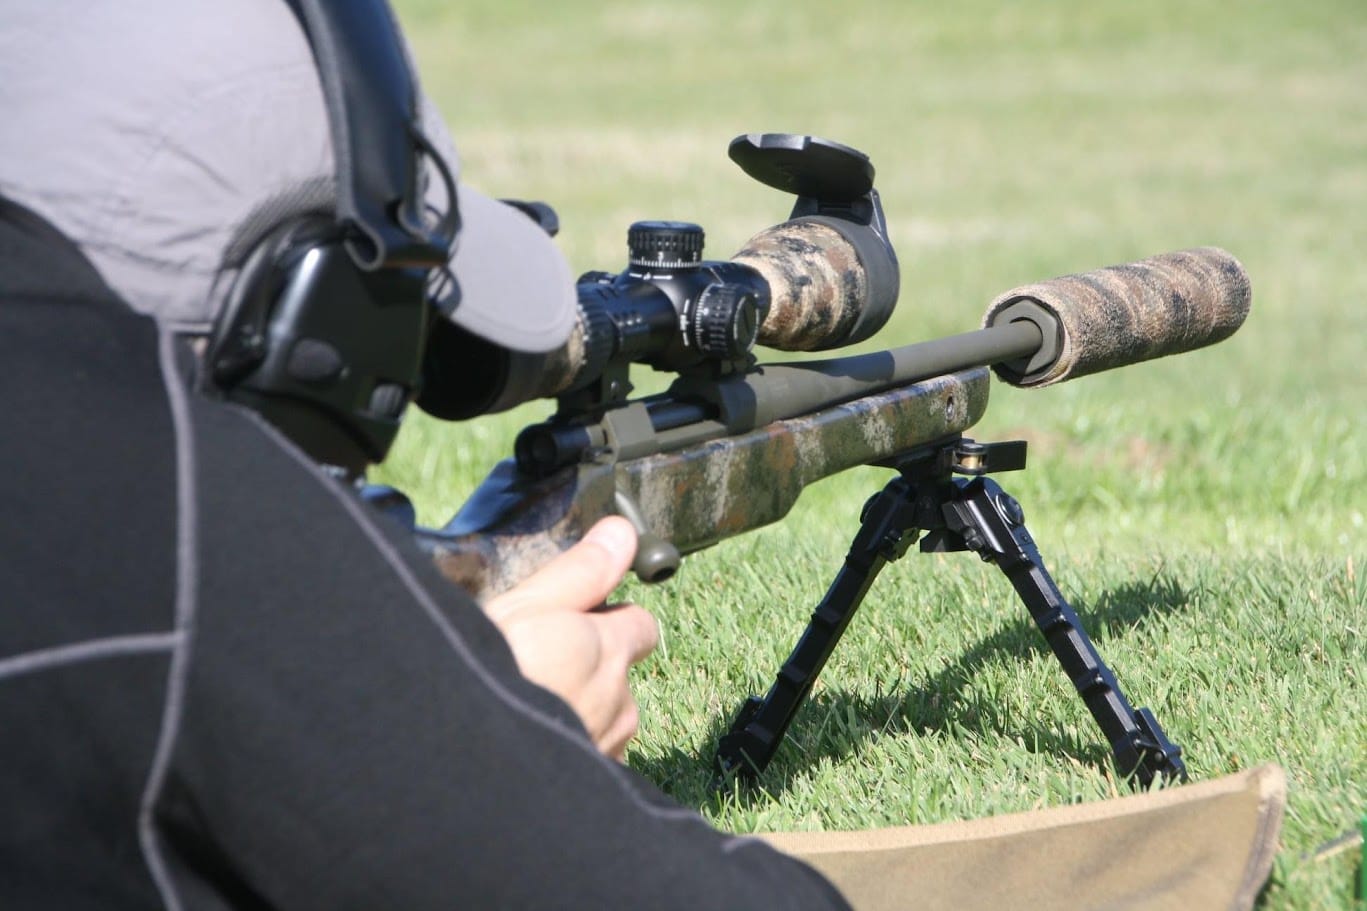
Although this rifle began life as a lightweight hunting rifle, that wasn’t the end of its journey.
Long before I was a hunter, I was a target shooter.
Naturally, I wanted to see what this rifle was capable of.
Using exactly the same rifle, I competed in F-Class style shooting at Sedon Military Range, engaging targets out to 1,000 yards.
Despite competing against purpose-built heavy-barrel competition rifles, this lightweight hunting rifle consistently proved it had the accuracy to hold its own.
That was incredibly satisfying.
Looking back, I realised this project was never really about building a single rifle.
It was about building a shooting platform.
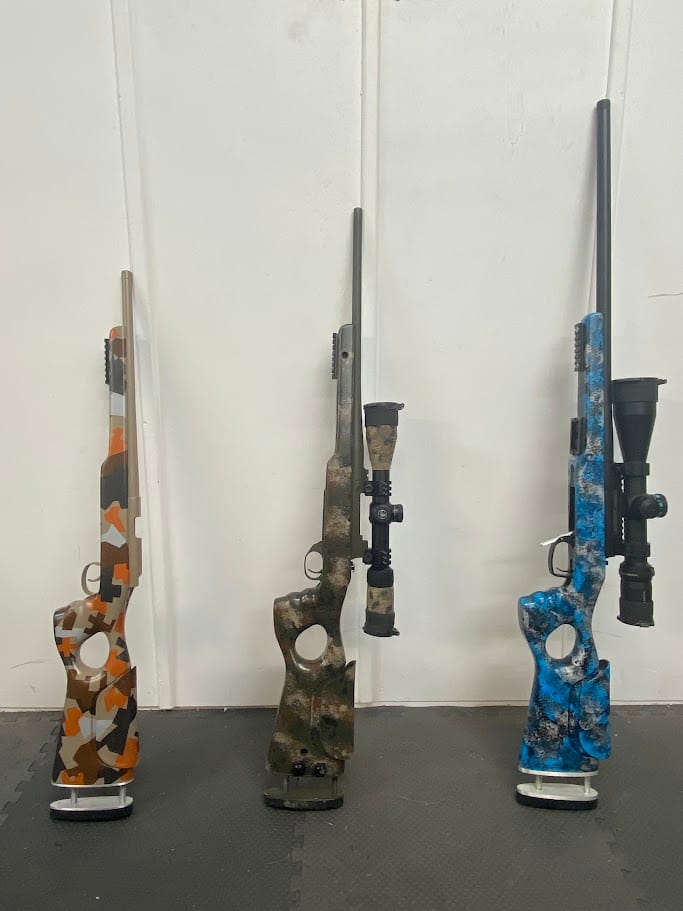
Using the same plug and mould, I eventually built three different rifles.
A lightweight .22 LR trainer for practising the fundamentals.
A lightweight 6.5 Creedmoor hunting rifle.
And finally, a heavy-barrel 6.5 Creedmoor competition rifle.
Each one served a different purpose.
But every one of them fitted exactly the same.
The same grip.
The same cheek weld.
The same trigger reach.
The same length of pull.
Every hour spent practising with the .22 LR reinforced exactly the same shooting position I used on the competition range and in the hunting field.
To me, that was the real success of this project.
I wasn’t simply building composite rifle stocks.
I was building consistency.
I was building repeatability.
I was building a shooting platform that became an extension of myself.
And when I eventually looked at those three rifles standing side by side, I knew every hour spent building the original plug and mould had been worth it.